I’ve got this late 2015 27" iMac and if I can use that for a time I’d prefer to do that. It doesn’t appear that that can be done. It’s too new! The “target display” is no longer available in this version. This article details the iMac models and how to do it for each.
It seems there’s two options and both are a commercial solution. One is to purchase the Luna Display adapter for $119, not bad. The other is the Duet Display cloud service for $2.09/month. Also not a bad price. The article says there are lag times in both these options.
Has anyone used either of these and what was your experience?
Another question is there a way to connect a new M4 MacBook Pro to a late 2025 iMac that I’m not finding out about?
I suppose that for $2.09/month I can give the Duet Display a shot.
There was a HW hack - a board somewhere that turns it into a true 5k display. I have several 27 inch iMacs 5k floating around and cringe every time I use a 4k display. I think either wait for the 5k displays coming down the pipe shown at CES 2025 or suck up th $1300 for a Cinema Display.
Very helpful. I can deal with the seemingly small performance issues. Not being able to unlock my Macs with my watch? Not so much. Then having to reposition all the second monitor windows back to the second monitor because they gather in the first? Not so much.
Not ruling it out but hesitating on it. I might try the Duet Display which is actually $6/month.
PS- I have Thunderbolt 2 on my iMac and it has 2 ports on the back. Could I plug in a Thunderbolt HDMI display adapter and connect to HDMI on MacBook Pro?
No, that won’t work. Those TB2 ports support video out only, not video in.
It’s a real shame that Apple didn’t from the start include video in options for their AIO Macs so they could be used as screens without macOS. It’s no secret that these 5K panels can far outlast the useful life of the Mac’s CPU. For a company that likes to emphasize being environmentally friendly, not providing any video in options and thus adding to premature landfilling is a disappointment.
Sad Apple did away with target display mode, I found it very useful on several occasions but didn’t realise it was already 2014 Macs were the end. Wish it had continued.
I think I read some iPads can be used as additional displays, if you have a large one maybe that would help but it wouldn’t be 27" of course nor repurpose a fully useful Mac.
I use the Luna dongle to repurpose an old iPad as a second display for my Mac. I’ve never encountered any noticeable lag, but I don’t use my Mac for gaming.
Here’s an article that shows some of the work involved to install such a board:
Some things I noticed:
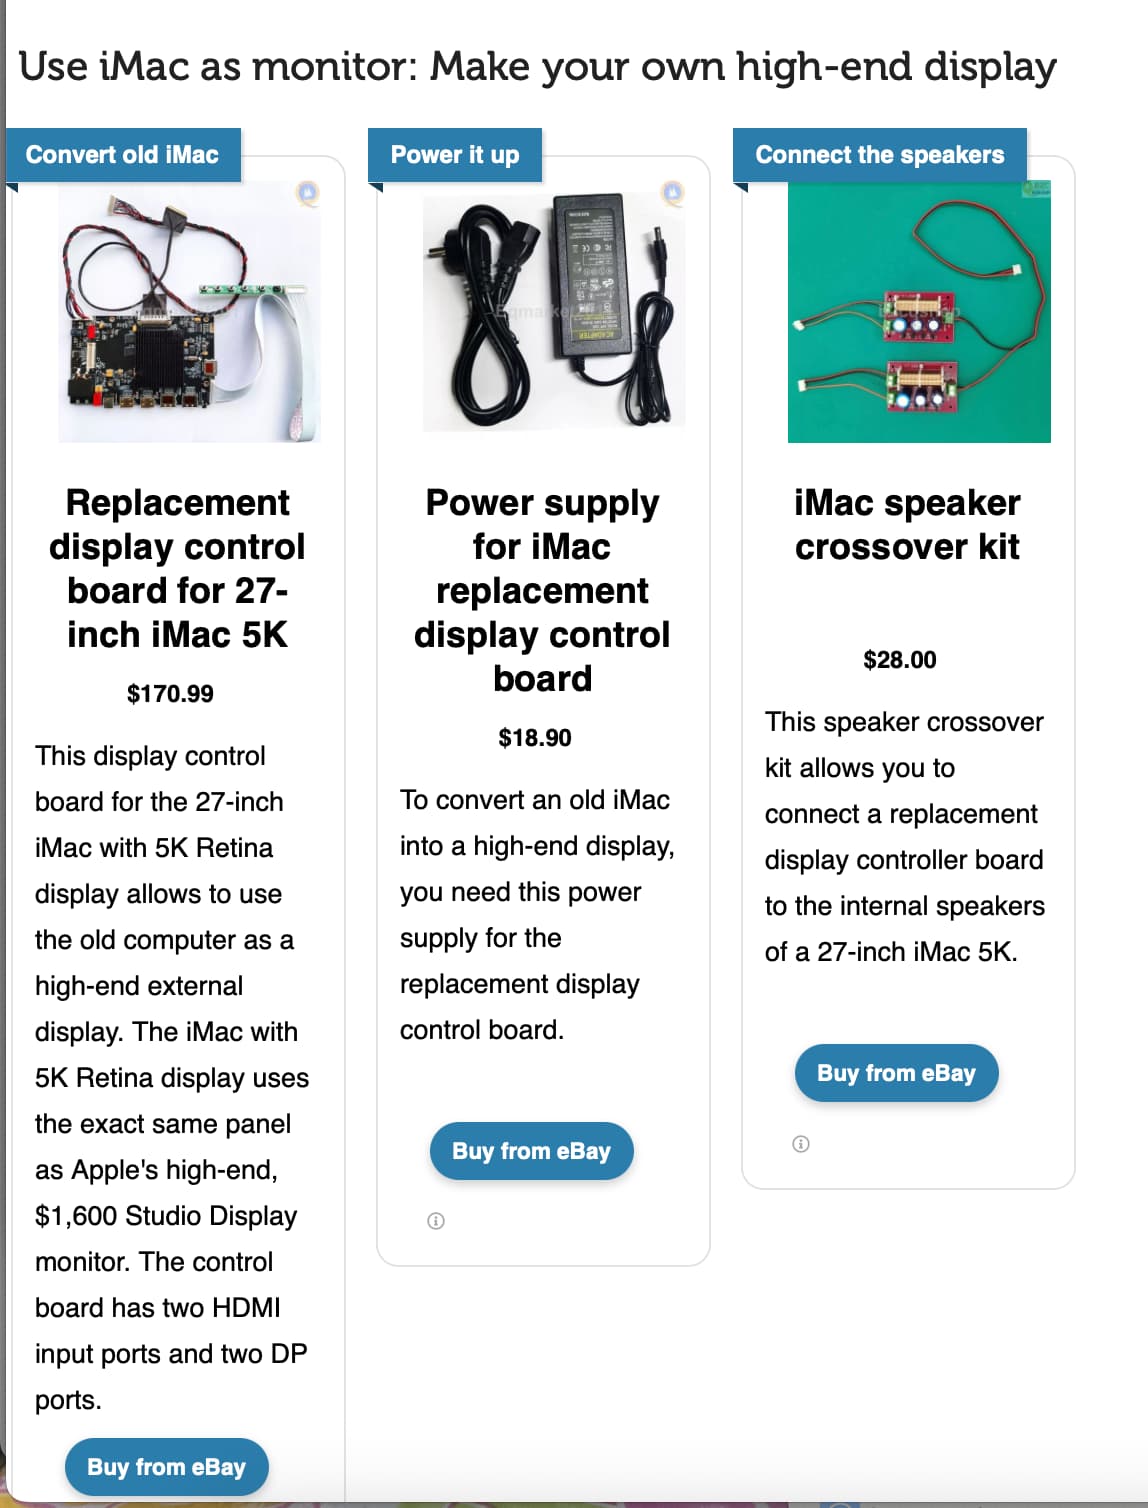
That $170 board doesn’t include a power supply or an audio-crossover board (to send HDMI audio to the iMac’s speakers).
The boards don’t use the original iMac power supply. Which is a real shame. I don’t like the idea of throwing out/selling the Apple board and replacing it with an el-cheapo power brick.
The board’s ports don’t come close to lining up with the port-holes on the back of the Mac. You’ll be running your cables through a hole in the back of the Mac directly to the board.
Be sure to get good cables and connect them to every port on the board, even if you won’t be using them all, because you’ll have to remove the screen again to change the connections.
You’ll be expected to just cover (with duck tape or something) the holes where the original Apple ports used to be. Or have visible holes with no ports on the other side.
There is no mounting hardware for the existing Apple standoffs. You’ll be mounting everything with Velcro or hot glue or something similar.
Since the new circuitry weighs a lot less than the original Apple parts, you’ll need to install a few pounds of lead weights so the display will be balanced enough for the tilt-stand to work.
The board has a button-panel and may also have a remote control to manipulate the display’s on-screen menus. There is no pretty way to expose all this unless you want to cut new holes in the metal enclosure.
The article I linked to (and its embedded YouTube video) wires the Apple power button to the board’s power switch, but the rest are just left inaccessible inside the case. So make all your adjustments before you close up the case.
In short: I think this is a kind of cool project for a hobbyist, but the kits are not polished enough to have a good-looking result. If anyone reading this is involved with one of those projects, here’s what you need to do to bring the kit up to commercial quality:
Use the old iMac power supply board.
Include whatever bridge/pre-amp is required so you can just plug in the original Apple speakers.
Design the parts so they can be mounted with the original Apple standoffs and mounting screws.
Provide a way so the ports and control buttons are easily accessible. If there’s an existing rectangular cutout somewhere, provide a mounting bracket and bezel to use it. If a hole must be cut, provide a template and specify what tool should be used (can you use a Dremel cutting disc? Or is the metal too strong for that?)
A few old iMacs (late 2009 through mid-2011) had IR sensors for an Apple Remote. The sensor was (I think) behind the Apple logo, which was IR-transparent. I assume the logo in a 2015 iMac is opaque, but maybe it can be replaced with an IR-transparent logo in order to mount the display’s IR sensor there. That would be really cool.
After thinking about this a bit more, it has become painfully obvious that none of these projects are iMac conversion kits. They are bare boards meant for building cheap LCD displays using the particular panels that Apple has used for certain iMac models.
The intended use is for small manufacturers (like the ones you find all over Amazon, eBay, AliExpress and elsewhere) to make computer monitors from cheap/surplus LCD panels.
The fact that some hobbyists are using them to convert old iMacs to standalone displays, notwithstanding, these boards are really only one part of what you would need for a proper iMac conversion kit.
Agreed and it helps if you have a couple of these lying around (free) as we do. But for $200 and out of pure frustration I’d be willing to take a gamble as I have yet to find a nice 4k monitor for my M4 mini. I’ve tried a few “recommend” replacement monitors (Not any 5K ones) and they all suck! Especially when right next to it is the old 2017 5K iMac! It’s all there for you on ebay too!
If there are any electronics repair shops nearby (the sort that will replace capacitors and other board level repairs), I wouldn’t be surprised if they would do the repair for $150-250 plus parts. Selling the original power supply, motherboard, RAM, etc., might defray some of the expense. Even with the age of the display, that’s not too bad for a nice 5K display.
Given how inexpensive old 5K iMacs are these days, It almost seems like converting them this way would be a reasonable hobby business or side business, but I guess the age of the display and the hassles/costs of shipping and support make it not quite worth the effort.
Just an idea… how about screen sharing?
As I fumble through a slightly different project than yours, I tried using a 1m Thunderbolt cable between MBAir (M2) and MBPro (older) and it was way faster than wifi.
Then I tried screen sharing over the cable and couldn’t get it to work, though it works with a slight lag on wifi. From what I’ve read on Apple.com and in ebooks, screen sharing should work ‘over the LAN’ without specifying wifi or cabled.
The cable I tried is an Anker for Thunderbolt 5, supporting 8K displays (whatever that is), high speed data transfer (which I was hoping for), and 240W power (whatever that is good for). Possibly more capability than I can use but at least more future proof.
So IF screen sharing works over a cable between your M4MBP and the iMac, it might be a solution for under $100 and not involve and surgery on the iMac.
I’m using the Luna Displays dongle solution with a 2019 iMac and it’s great for me. I decided to give it a try after reading Adam’s article (linked above) and knowing the limitations he mentioned, figuring I might return it if it was problematic, but still using it years later.
I use the iMac standalone to run some older software (for my still functioning ScanScanp S510M, now with macOS in a VM), and then as a secondary display for a M1 MBPro (primary is a Dell U3223QE, discussed here), mostly when coding or other multiple big window project. I have them networked via a gig ethernet switch, and notice no lag in that use.
The loss of unlock via Apple Watch doesn’t bother me at all*. Since it’s not an every day use (but when used is often multiple days in a row) I haven’t noticed the window repositioning problem at all. When it disconnects after going to sleep, everything is where I want it after it reconnects. But I have not done elaborate testing with that.
I did look into the DIY hack options as I wouldn’t mind tinkering and I have a 2013 iMac around as well, but I didn’t like some of the gotchas like loss of apple power supply, and more notably the last time I looked (several years ago) the board the detailed blog post used was no longer available from the source and there wasn’t a clear replacement at the time.
*actually ran into an Apple Watch unlock problem the other day not related to Luna which actually has me considering disabling it. I sat down at computer, and watch hadn’t unlocked (sometimes it fails for me, or takes long enough that I press a key to get the password box and type it in). The password box was already showing so I started typing it in and hit enter. Just then the watch unlocked the computer, my password was entered into Messages and sent! Less than ideal to say the least. I unsent the msg quickly but still had to change it.