Scanning 35mm slides to Photos

First off, don’t worry about the slide holders. They’re convenient, but they’re just a plastic frame for positioning slides. You can make your own with a sheet of cardboard. Just cut slide-size holes in it so that they are under the transparency projector in the lid.

The only potential gotcha is that the holders have a notch in them toward the back of the holder, which you also need to cut out (the transparency projector shines through it for some self-calibration mode). At least that’s the case for my Perfection 4870 Photo scanner.

Don’t bother with the included software. EpsonScan works, but I don’t think it’s a very good app.

VueScan does support Digital ICE. Well, to be pedantic, they don’t support that, because Digital ICE is a trademarked name/algorithm. But they do support scanning with the infrared lamp (using their own algorithm, which they claim is better than the ICE algorithm) in order to detect and remove dust. You can check if it has support for your hardware on the scanner support page. Here’s the page for an Epson V600 and IR scanning is supported.

I personally use SilverFast for my scanning. It’s a bit more expensive, although the entry-level “SE” version is not too expensive ($50), unless you need Kodachrome support, which is only in the “SE Plus” version ($100). It has V600 support and has its own IR-based scratch removal system (iSRD). There is a bit of a learning curve, but it’s not hard to figure out and it has very good support for scanning slides and negatives, including a database of popular film types for more precise color calibration.

One feature I use a lot in SilverFast is batch scanning. With this, after you perform the preview scan, you can drag rectangles around multiple images (e.g. each slide in the holder). The software will scan each of those rectangles to a separate output file (or a separate document window if you’re scanning via the Photoshop plugin). This way you can set up as many slides as will fit on the glass, start a batch scan and go do something else while it runs (see below - high resolution scanning can take a long time).

It appears that VueScan also supports this via the Multi crop feature.

The biggest problem with scanning slides on any flatbed scanner is that it takes a long time. Scanning a slide at 3600 dpi (which will produce an image of about 5040x3384 from a standard 35mm slide, and will print to 8.5x11 paper at about 400 dpi) may take several minutes per slide. It’s been a while since I scanned slides, but I remember that a tray of 8 slides on my scanner took well over an hour to complete.

You can scan at lower resolutions, but the results may not be good enough if you want to make prints or copy regions of the image later on. You may be able to scan at higher resolutions (a V600’s optical DPI is 6400), but in my experience, that is scanning finer than the film’s grain, so you don’t gain anything in exchange for an even slower scan and larger file sizes.

Because of the time involved, you may find it worthwhile to hire someone to scan your slides if you have a lot to do, otherwise you’re going to be spending a lot of time with the computer as you scan everything.

2 Likes

Hi. Unless unlike me you’re really good at cleaning slides, you’ll want Digital ICE. It’s really really good for removing dust without serious digital artifacts, unless your slides are mostly Kodachrome, which Digital ICE and other forms of infrared cleaning often do not work well with. Unfortunately, Epson Scan no longer has Digital ICE for Mojave and later. They will give you SilverFast but its infrared cleaning is poor compared to Digital ICE. I never had good results with infrared cleaning of slides on VueScan either.

1 Like

Former photographer here. I’ve scanned about 600 slides in the past couple of weeks with a Kodak scanner. The results are acceptable but not great. If the slides are well exposed with a limited range of illumination it works quite well. Where it falls down is more difficult images where there might be a great range of light - it struggles with images which are rear lit even if the exposure is perfect.

For normal family and holiday pics I’m happy to live with it as it’s very fast to get through large numbers. However, I’m going to go back to my previous method of ‘scanning’ which is to use an old Sony a6000 camera with a macro lens. I have a custom built box which takes slides and I can photograph them with either a flash or LED light. The results are far, far better than any scanner but it takes considerably more time and effort.

Very interesting thread. About 15 years ago, I scanned ~2K slides using a flatbed scanner with its included slide holder (maybe 12 slides total per scan?). The results were OK, but the focus just wasn’t sharp on any of them. I assumed the issue was the tiny gap between the slide and the bed due to the holder (and maybe compounded by the even tinier gap between the film and the paper mount?). Have other slide scanners overcome this issue? I’ve thought about getting them rescanned at a service bureau, but have hesitated due to cost and the uncertainty that they’d come out any better than what I already have.

Jeff - Do you remember what model scanner you used? I too have lots of slides to scan, and am watching this thread. I have an Epson V700 but have not yet been motivated to begin after some poor first tries years ago.

Yep. Still sitting right here on my desk. An Epson Perfection 2400 Photo. Purchased in 2003. So I’ve gotten my money’s worth out of it. :slight_smile:

Thank you Richard, that is very helpful. All the slides are Kodak - he wouldn’t have anything else. He lived in Buffalo and then Rochester (where he got his post-retirement job heading up a police science program thanks to another former agent who was in charge of Eastman Kodak’s security world wide - so guess what film he used lol). Do you have any suggestions as to what would work if not Digital ICE? Something really cheap I hope!

Another solution — only practical for Nikon users, however — is this contraption:

https://www.bhphotovideo.com/c/product/1357884-REG/nikon_27192_es_2_film_digitalizing_adapet.html

It requires a Nikon DSLR or Z-series mirrorless camera, and one of four specific macro lenses, so unless you have or want one of those lenses and cameras, it would be pretty expensive. I recently bought one; I haven’t had a chance to put it to use yet, but some test shots are outstanding.

Back in the 80s and 90s when I was submitting a lot of material to magazines and libraries I used a PB-4 Nikon Slide Duplicating bellows with Kodak’s specialised dupe film. I only ever submitted dupes, never originals. It gave outstanding results and was what first prompted me to use a digital camera for slide copying.

First impressions on the Epson V600 flatbed with film and slide holders:

It’s better than the Wolverine! But not as quick.

Initial cons: the “manual” (i.e. piece of paper with pictures on it) is really lacking.

I tested it using 8 color negatives from 1987, 2 strips.

I installed whatever was on the CD that came with it, on an iMac running Sierra. Works fine but I was only able toggle output size accidentally and I don’t know how I did it. I finally redid it using a different setting at 4800 dpi.

I can’t tell if it’s just a coincidence, but on the higher resolution scans it will do 8 passes. It almost seems to stall between passes unless I move the mouse. Using the Home setting, it took over 30 minutes to scan the 8 negatives, name and save them. File size were just over 20mb each.

I then tried VueScan which is unregistered on that machine. It only scans one negative at a time so it seems to take less time, but would probably be more time consuming in the long run since I had to reset the scan box for each negative. There may be a way around that but I didn’t look too hard. I’ll transfer my license to that machine when I get a minute. While it still produced a large image on my screen, it was only 2.2mb

Difference between the two: (keep in mind I didn’t play with the settings too much)

The Vuescan result is pretty true to the original photo but with a little more detail (photo in question is still in a box and is probably matte). But the colors look right to my memory. There are people in the background that have more detail than the Wolverine or the print had. They were not the center of focus so they didn’t have a ton of detail to begin with.

The Epson result is much brighter, probably a bit too bright color-wise. It is a more grainy scan overall, including the foreground object. There is more detail to the people in the background.

I have not tried slides yet but I think I have one sitting here on my desk I can try.

Overall my first impression is that it was worth the investment.

Diane

2 Likes

Having recently finished scanning over 8000 slides and a few negatives I can say that you get what you pay for. Cheap scanners will not produce the same quality as high-end scanners.

The best slide/negative scanners are no longer being produced. These include the Nikon 5000ED and 9000ED and the Konica Minolta DiMAGE scanners. Too bad because these were very high-quality instruments. You can still find these for sale on eBay.

Quality scans with high resolution – from any scanner – take time. My Nikon 5000 takes anywhere from 3-5 minutes per slide/neg. Digital ICE and other options add more time.

All my scans have been saved as 16-bit, 4000 dpi TIFF images so each image is about 100 MB. From these TIFF images, I can create high-quality 8-bit JPEG images.

If you have thousands of slides/negs to scan it is probably more economical to buy a high-quality scanner and do the work yourself. If you have only a few tens or hundreds it is better to find a quality service company and let them do it.

Oh! haha the 8 passes were one for each negative. It still seemed like it was hesitating between each one.

The slide came out much better with the Epson software.

Trying 1940s/50s b&w pix now

Diane

Of course, it’s impossible to ask detailed questions about 15 years ago, but I think the cause must have been something else. I have yet to see a scanner where its depth-of-field is so narrow that it can only focus on objects actually touching the glass. The small gap from a slide’s mount (or suspending a negative in the provided holder) shouldn’t affect the focus.

Assuming the scanner itself wasn’t damaged and there were no smudges on the optics, I would guess that you were scanning at a too-low resolution. 300 or 600 dpi, while fine when scanning a print, is far too low for a 35mm slide, whose total size is approximately 1.5" wide and 1" tall.

Or the photos actually were out of focus. If you have a projector available, you might want to view them that way, in order to determine if that is the situation.

I assume this is one pass per slide (you said you were batch-scanning 8 negatives). This isn’t surprising, because each one will (or should) be saved to a separate file.

A 4800 dpi scan will likely take a very long time per slide. Since the Home setting took 30 minutes to do 8 slides, I assume it is not scanning at 4800 dpi.

As I thought (I just got down to the end of this thread).

The pause between slides is also not surprising. The software needs to process the data it scanned (sharpening, histogram adjustment, etc., depending on what features you have turned on), then encode it to the output format (JPG, PNG, TIFF, etc.) and save it to the file system. It will do this before moving on to the next image.

And the scanner may take a moment to reset/recalibrate itself as well.

If your scanner software has a good quality progress bar, you may be able to see it doing something during this period.

I don’t use VueScan, but I checked their on-line documentation yesterday. There is a Crop | Multi crop feature that should let you batch-scan all 8 images at once. It also has an “auto” mode that (if it works as described) will automatically locate each image on the scanner.

Regarding colors when scanning negatives, it’s a bit tricky. You can’t just scan the film and invert the colors - if you do, you’ll get a color cast (often blue-ish). Good scanner software should have an mode for scanning negatives which will have correct for this. Better software will let you specify the brand/type of film (it’s usually printed on the film, in the margins), in order to make the colors as accurate as possible. (It appears that VueScan has a database of film types.)

And if you have Kodachrome slides, your software needs to have features designed for it in order to get good results. Kodachrome has an extremely high gamut - likely beyond your computer’s monitor. With most scanners, you probably need to perform an HDR-like capture (e.g. scan at multiple exposures and digitally combine them) in order to capture this. And you need to calibrate your scanner to the film.

If your software doesn’t do this, the scans will look dull and will probably have a blue-ish color cast. I know that SilverFast’s SE+ product has Kodachrome support.

VueScan has a Kodachrome film type, but I don’t know how well it works. I highly doubt Epson’s free software has any such capability.

One thing to be aware of - Digital ICE (or any use of the infrared optics) will not work on B&W negatives/slides. The silver halide emulsion renders the IR scan useless. So don’t even bother when scanning these media.

2 Likes

WRT to the slides - I tried a Kodachrome slide from 1979. I seem to remember getting this one printed when I was young but not sure if I can find the print now.

The Epson scan was stunning!

The Vuescan scan was a bit soft.

I still need to play with settings.

The Epson software did well on the old B&W photos. It restored faces in a faded photo and restored a crease in another. I put 6 photos on the scanner and it correctly separated 4 of them. The other two were scanned as one image. Two years ago I was painstakingly scanning these pictures in one at a time and never finished the stack. This did a much better job in less time.

I’ll try and upload the slide scans if they are small enough.

Diane


Again, I haven’t played with the settings much.

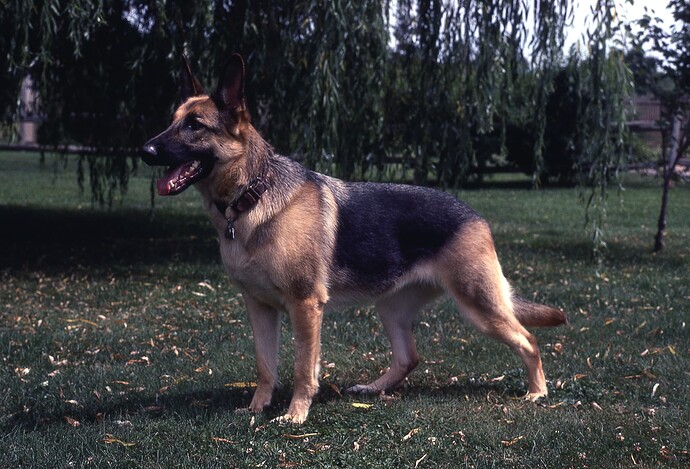
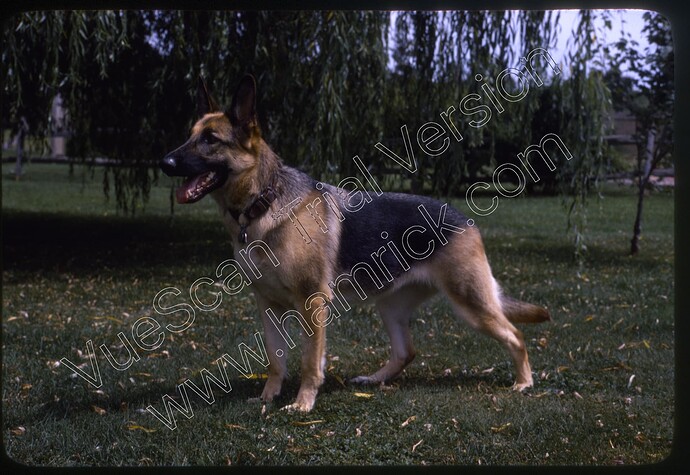
1979 Kodachrome slide

Nice dog! It looks to me like mostly the contrast is set different between the two.

I’m blaming you for making me wander around the house all afternoon trying to figure out what I can move elsewhere so I can have my V600 out all the time in hopes of getting more scans done…

1 Like

Thanks!! I need to sit down and experiment with the settings more.

And sorry, not sorry. haha!! I’ve already been grumbling at how awkward it is where I put it, but I’ll figure it out. Glad I set it up today, it was well worth the time :slight_smile:

Diane

Wow, I never thought of it like that (in my mind depth of field was a function of the aperture of a circular lens), but you’re right. If there is a focal point, then there must be a depth of field, however that focal point is achieved on a flatbed scanner.

OK, experiment time then. Given that storage space was much more precious 15 years ago than it is now, I bet I did scan them at a sub-optimal resolution. Time to find out. Thanks.

Hi Douglas. Kodak Ektachrome is fine for Digital ICE.

The reason digital cleaning has issues on Kodachrome is that one of the Kodachrome pigments prevents infrared light from passing through the slide, so the software considers that to be dust. The bright areas, such as daytime sky, don’t have issues, but borders will have artifacts. One typical example is a person standing might have weird dots around where their jeans end and the background begins. A much worse example is a tree with lots of light shining through the dense branches.

For Kodachrome you have 3 choices in my opinion.

(1). Don’t worry about the dust. Lots of people look right through the dirt, and it can even have a certain charm, in the same way an old faded Polaroid print might.

(2) Carefully clean the slide, and as needed the scanner glass. For the slide I used a rocket air blower. I would never trust myself to use the liquid chemicals that some have had success with. Then after the scan hand clean the dirt with your photo editing software.

(3). This is the somewhat crazy method I used, but it worked well for me. It’s actually faster than (2), at least most of the time. I scanned each Kodachrome slide twice as TIFFs: once with Digital ICE and once without. I put both scans as layers in Pixelmator Pro. Then I cut out any regions from the top layer that I didn’t like (e.g. undesired artifacts caused by Digital ICE if that’s your top layer), and hand-cleaned the visible parts of the non-ICEd layer.

5 Likes

re: scanner depth of field, there’s a good though old (2012) comparison between CIS and CCD depth of field in two canon scanners:

CIS could be better now, but I did have two multifunction scanners in the past (canon and brother) that were blurry at spots where the paper wasn’t quite flat, such as a crease. I would hope that anything claiming ‘photo’ would be better tuned than a multifunction, but testing is a virtue.