The right way to erase disk for a clean install on Catalina/Big Sur

I was looking up information about clean installing macOS Big Sur and was surprised to find conflicting information about erasing the startup disk, specifically when it comes to dealing with the “Macintosh HD” and “Macintosh HD - Data” volumes.

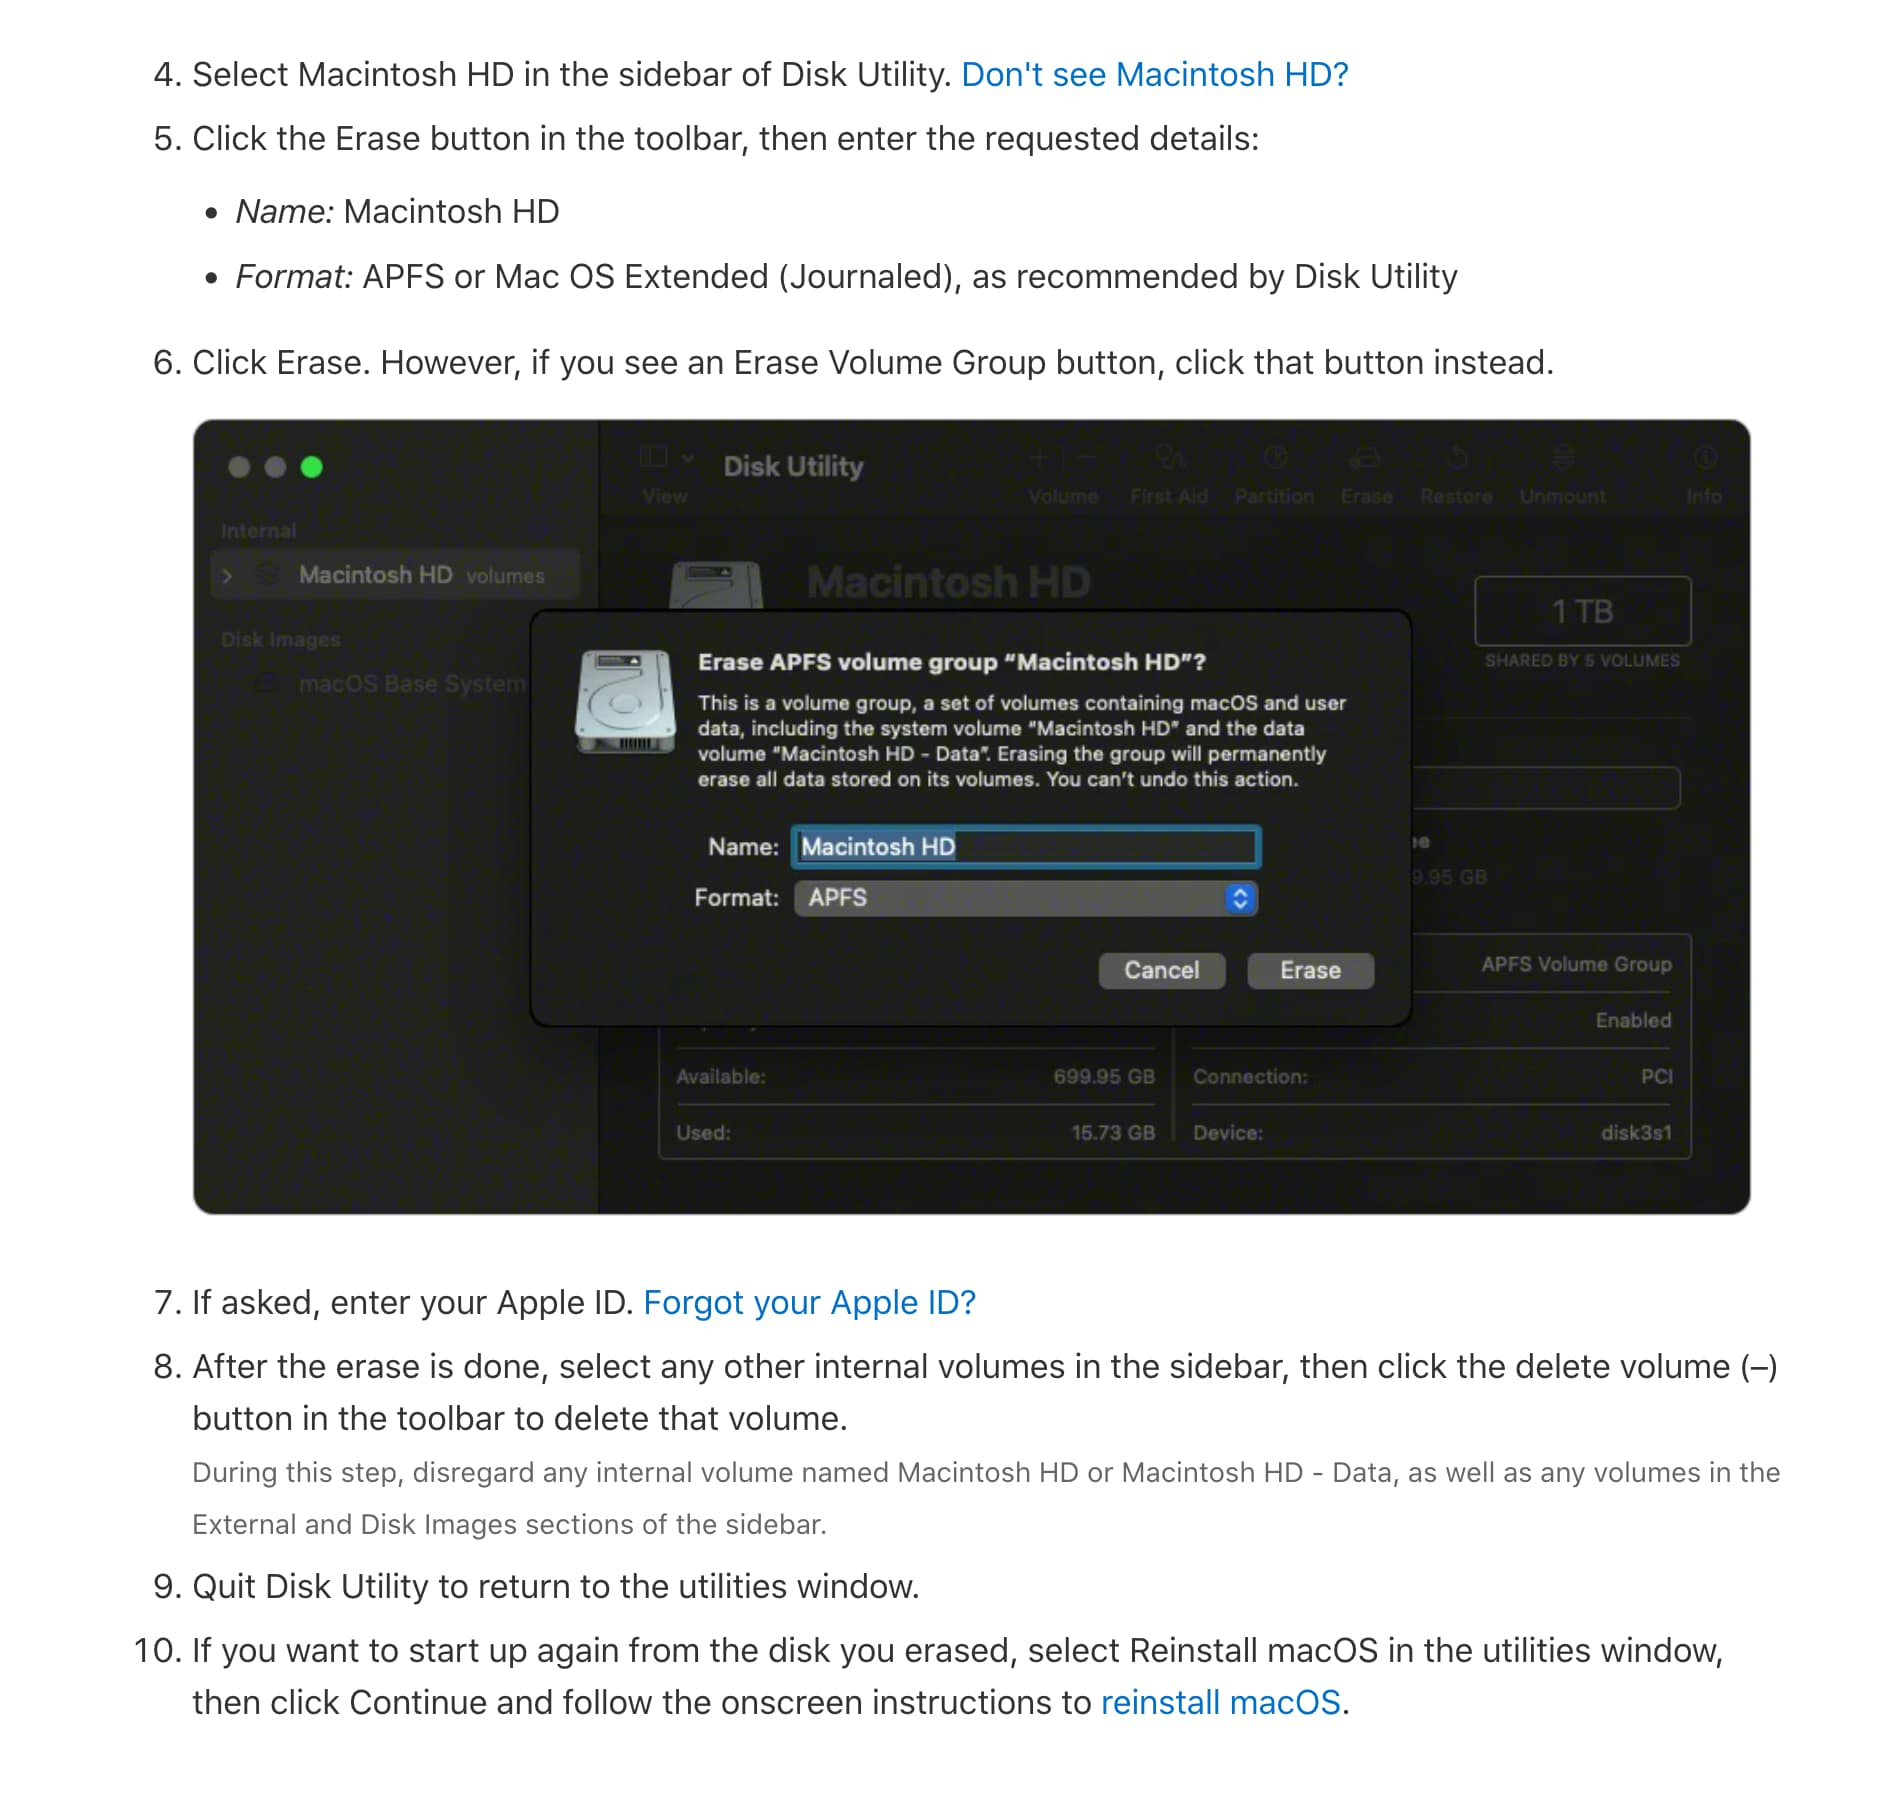
Apple’s latest support article mentions selecting “Macintosh HD” and clicking on Erase Volume Group.

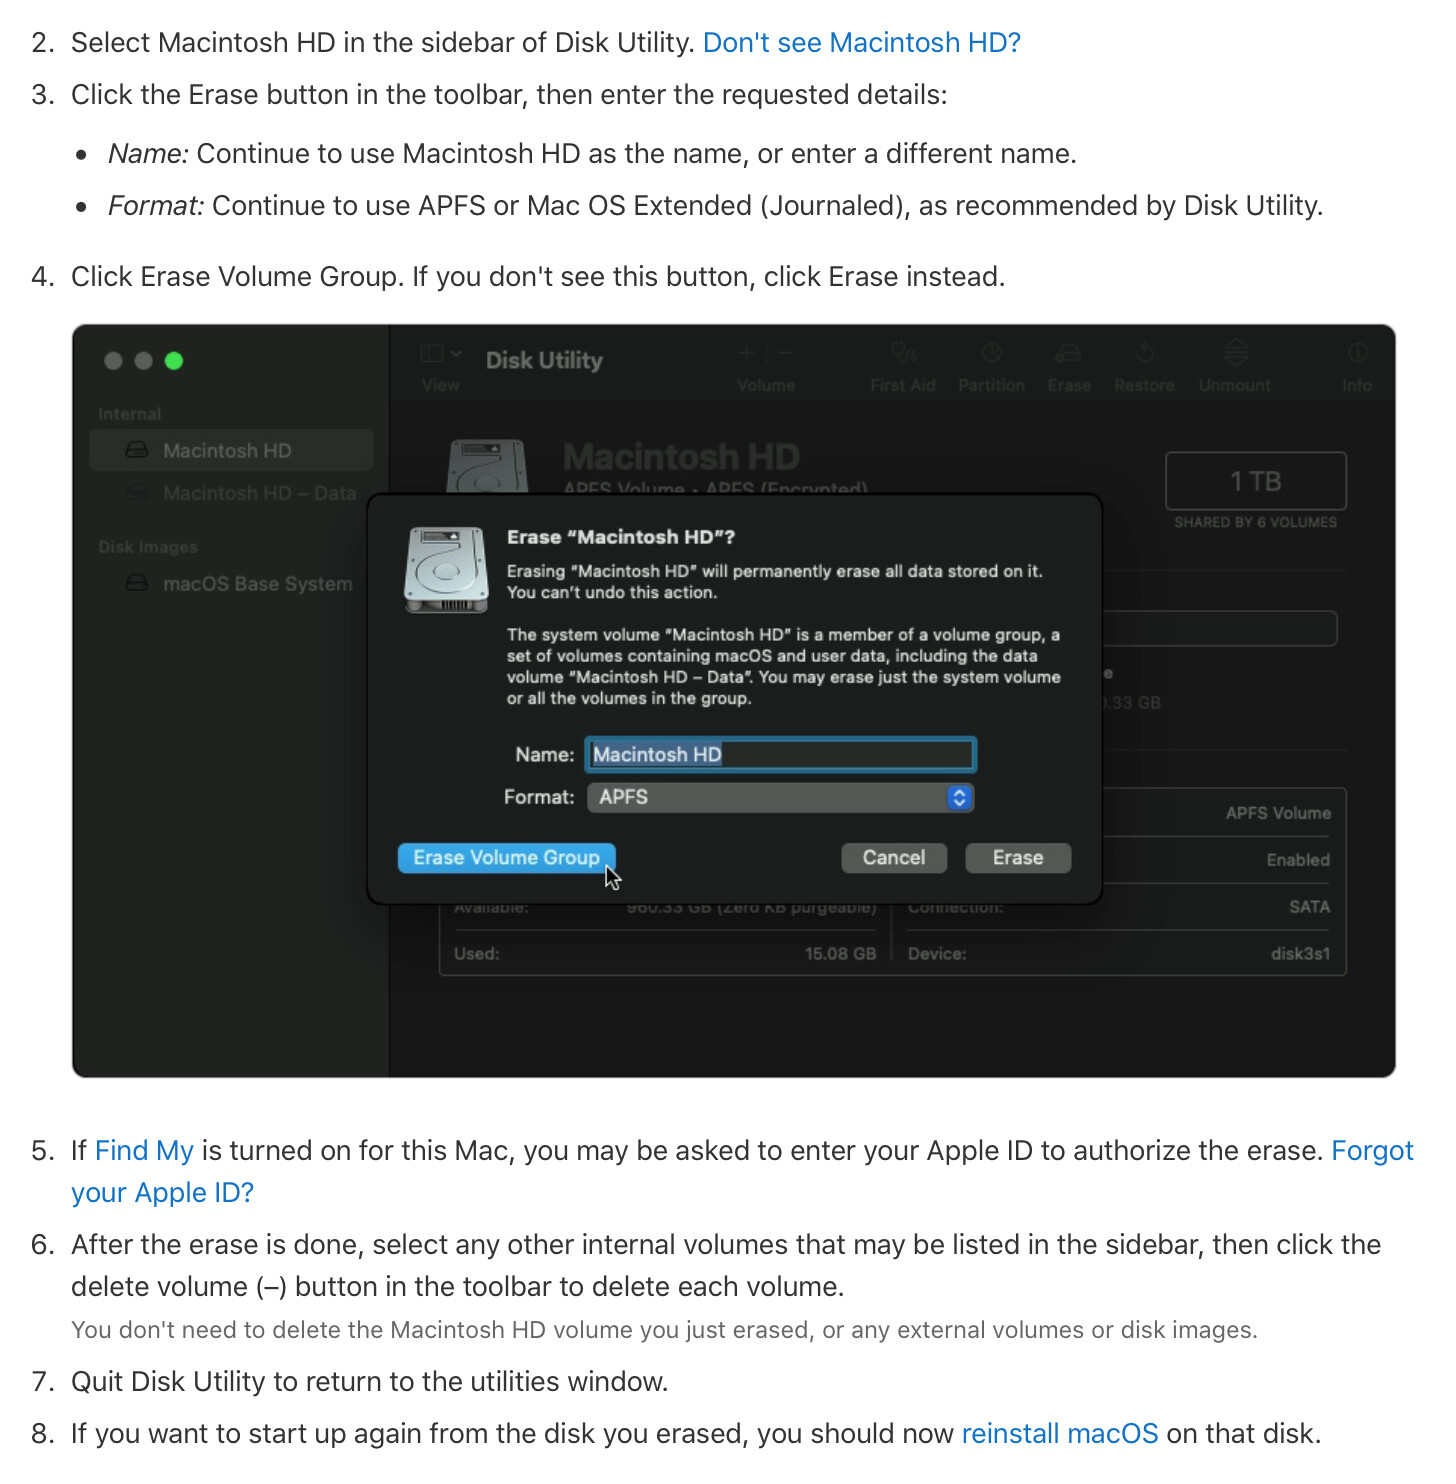
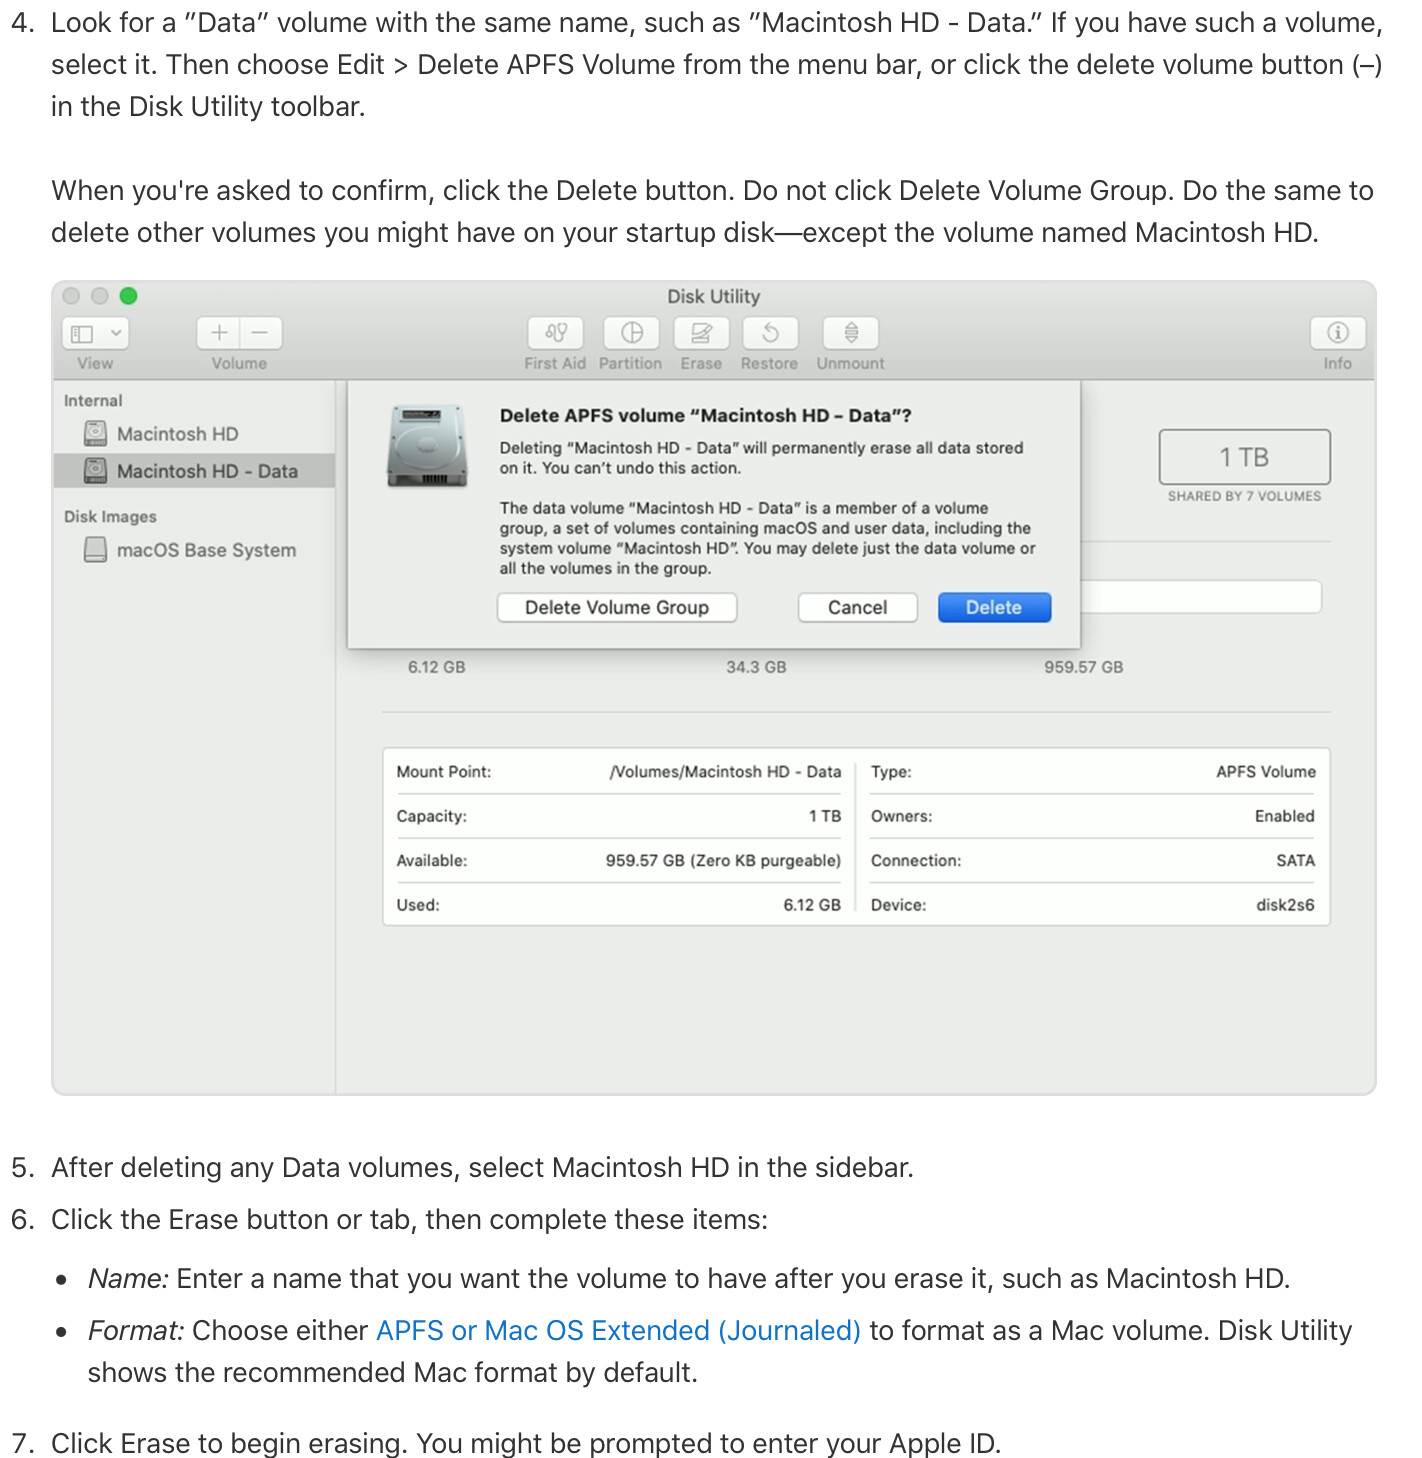
Surprisingly, an earlier iteration (March 31, 2020) of the same support article (accessed using the wonderful Wayback Machine) contradicts the above instructions and specifically instructs you to delete the “Macintosh HD - Data” volume followed by the “Macintosh HD” volume and not to click the Delete Volume Group. See this screenshot:

Yet another version (August 31, 2020), disregards dealing with volumes and recommends deleting the top-level disk itself.

To make matters more confusing, Macworld too has conflicting sets of recommendations. On this page, it recommends deleting the “Macintosh HD - Data” volume followed by the “Macintosh HD” volume on both Catalina and Big Sur. However, the page links to another page which suggests the Delete Volume Group option for Big Sur as “this will ensure you delete both the Macintosh HD and Macintosh HD - Data” but the aforementioned method of deleting the “Macintosh HD - Data” volume followed by the “Macintosh HD” volume for Catalina.

I hope I have not framed this in a manner that makes the issue even more confusing! I’d love to hear what people here think is the best way to erase a disk on both Catalina and Big Sur. Thanks!

Very interesting.

The article from August 2020 looks clearly wrong. If you’re booted from the Recovery volume, then you can’t delete the entire disk because that would delete the Recovery volume itself - which is in use.

If you want to delete the entire disk, you would need to boot from something else (e.g. a bootable system installer flash drive) first. But that is going to be pretty risky on an M1 Mac, since there are several pre-boot and recovery volumes whose deletion could end up bricking the computer (at least until manually reinstalled with Configurator 2). Hopefully, the M1 macOS Disk Utility has something to prevent you from deleting (at least without really really meaning it) these internal APFS containers.

I’m not sure why the March version of the instructions doesn’t want you to remove the volume group. Note that it is not talking about the APFS container - deleting that would blow away the Recovery volume you’re booted from. The volume group is an artificial construct to tie the system volume to its data volume. If you’re deleting both of those volumes, then I don’t see why deleting the group would matter one way or the other.

The only explanation I can think of is that maybe the macOS installer at the time had a bug where it failed to re-create the volume group correctly or where it expects you to pre-create the group first. Or maybe Apple was concerned that some systems might have additional volumes in the group and they didn’t want you to accidentally delete them as well.

The current instructions make the most sense to me. Deleting the volume group means it will blow away the macOS system volume any any other volumes closely tied to it, but it won’t touch any of the other volumes that may exist on the device:

  • The ISC APFS container (providing BootROM-like services on M1 Macs)
  • The 1TR (One True Recovery) APFS container (on M1 Macs only)
  • The EFI partition (Intel Macs only)
  • The Recovery, Preboot, VM and Update volumes in the system APFS container
1 Like

I realize this conversation is focused on Big Sur, but wanted to highlight that this process is confusing and possibly not correctly documented on Monterey as well.

I am working on a 2018 mac mini that has the T2 chip machine that has had macos upgraded since its original purchase around the time of release.

The official guidance is to use Erase All Settings and Content, which is the new method for “preparing a mac for a new owner.”

However, what I found is that this process left a container with a volume Macintosh HD - Data that used up half of the 500gb drive.

I read some anecdote of someone in a similar position having the matter magically resolve a week later. (Perhaps the OS figures out how to recover this space on its own?)

I don’t have time to test that theory, I just need the machine at its full potential, so I proceeded to the Disk Utility method in Recovery mode.

The current official steps for using Disk Utility specifically say to “disregard any internal volume named Macintosh HD or Macintosh HD - Data.”

However, there was no other way to get this space back. So the instructions are currently incorrect if facing this situation.

Even after I removed the “Macintosh HD - Data” volume, the container itself still showed some phantom mounted volume that was taking up the space:

Finally, I deleted this container, and a new one was created with a volume “untitled” that showed the correct amount of space it should have available.

I renamed this “untitled” volume “Macintosh HD” and then proceeded to the Reinstall Monterey option.

I hope this helps someone out there, there is very little information about this scenario online.

1 Like

Don’t know for sure about Big Sur, but for Monterey follow the latest instructions from Apple if you need to completely reinstall on a Mac. Especially if you have an M1 Mac. Don’t individually delete Macintosh OS and Macintosh OS - Data volumes, use the Delete Volume Group button if presented. Then complete your installation.

These procedures worked for me on a 2014 Mini that had a APFS corruption that Disk Utility could not fix, and I did not want it to come back at some point in the future and cause a problem. I had to nuke the whole thing. Can’t say when the issue was introduced but this particular mini had had a few version upgrades High Sierra → Catalina → Big Sur → Monterey as well as a 3rd party SATA SSD transplant to replace a HDD so who knows when it happened.

I haven’t seen a real good explanation on what happens behind the scenes with “Erase all settings” but it obviously is not the same a full clean installation. Nor does it have to be for what it was designed for.

It wouldn’t surprise me if there’s some APFS and encryption “shenanigans” going on behind the scenes when “Erase all settings…” is involved since this feature is supposedly only available on T2-equipped Intel or M1 Macs. That might explain why there’s some space that’s “unaccounted for” and the anecdotal “it came back later”.