My spouse retired and decided to go with a Mac for the first time after years of corporate PC’s.They figured it was easier for me to provide in-house tech support and have used an iPhone and iPad for years.
Right now, they are frustrated in using Photos to save copies of photos that they want to edit in Pixelmator for their art projects. The only way to save a copy of a photo is with the Export function but there’s no option to custom name the file like you can do in other apps using the Save As… function. This makes it difficult to identify photos when they go to open them for editing.
Does anyone know of an easy to use solution that would help in this workflow?
Well, there is a way using Export. If they give the photos a Title (Cmd-i while viewing the Photo, or Window menu | Info), there is a Title option at the top of the Get Info window.
When they File | Export the photos, there is a section File Naming, and they can change the name from Use File Name to Use Title.
I haven’t used Pixelmator for a while, but IIRC there is a way to make it an option when Editing a photo within the Photo app itself. But I may be wrong about that.
Select the image then either Command-D or right-Click and select Duplicate.
Drag the duplicate to the desktop. - rename and edit as required.
Alternatively, select edit on the duplicate in Photos and edit using Photos own features.
You can use Pixelmator, or Pixelmator Pro, to edit within Photos via their extensions. Then I suppose you can export the edited photo to send to someone else, although I have not done this.
I do not understand quite what you are trying to do. Hope this helps.
Unfortunately, using the Pixelmator extension within Photos still doesn’t give an easy option (ala Save As…) to save a copy with a new name.
However, it looks like the reverse may be the best bet. Pixelmator Pro can pull from the Photos library to create a new file and its Export function allows you to overwrite the file name.
The way to edit a Photos photo in an external editor is Image > Edit With > Pixelmator. Edit With is also available in the contextual menu.
If you “pull” the original file from the Photos Library, you will miss any changes you made in Photos — metadata or image adjustments. (The original is just that, the untouched original file.)
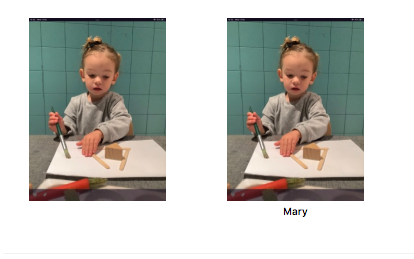
Shot 2 Shows the exact same bit of the Photos browser but I changed the name by just overtyping Fred with Mary.
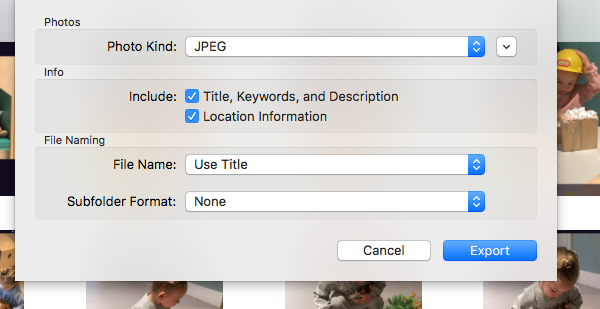
This doesn’t change the file name, but gives the image a title.
Now s select the image and select export.
This is what should come up. As you can see I have selected the Title to be the new file name of the exported file.
Pictures can be dragged straight out of Photo’s browser (again - unless something has changed recently) and then renamed on the desktop. All very traditional Apple.
The bulk of my work involves pictures and I’ve been working this way since iPhoto.
A someone already mentioned, Photos can use extensions from other imaging apps, in my case I have the Affinity apps and I use their extensions within Photos as more often than not I can achieve what I need to do without leaving Photos
I’m not disagreeing with you but spouse is not Mac-savvy and just wants to save a renamed copy outside Photos with minimal effort so they can store all the related photos in a separate folder. Right now, that’s more important than giving them a crash course in Photos.
There’s nothing simpler than dragging the image out of photos and renaming it on the desktop.
That way she will become more Mac-savvy.
If she doesn’t know how to rename on the desk-top - Click in the name under the file, when it changes colour type the new name.
With regard to Photos itself. it’s a much more powerful program than it looks. When it first replaced iPhoto I hated it. However, as it matured it has got better and better. It’s well worth taking the time to learn how to use it.
It has one interface item that I think confuses beginners. Selecting the Edit menu reveals no features that relate to image editing. Those are found under the Image menu.
A quick tip - Images are not changed in Photos. The original is hidden and you see only the changes. Everything can be undone back to the original , even weeks and months later by selecting Revert to Original
Nevertheless, I duplicate any image I will be working on as I may need more than one version.
As mentioned earlier, Extensions from third party apps can be added to increase the power.
One I particularly like is the Haze Remove tool from Affinity.
As I said, I now use Photos for almost everything, but to make life easier for me I keyword or title important images, otherwise finding stuff becomes rather tedious.
Why hasn’t anyone suggested Lyn? You can manage all photos in their original folders and do batch renames. Its reach is awesome and its listings of individual image values is comprehensive. Although I use Aperture (on an M1 Mac!) and Luminar AI (not Neo. It lacks sliders), Lyn has all the tools to correct and enhance them.