I have a few external drive enclosures that I haven’t used in a while. They are all good quality, one is OWC, I think one is G-technology, and I forget who made the other enclosure. Some are USB-2 + Firewire, I think the most recent is Firewire 3 (?). They are all wall powered and all have the drives inside. Given the port speeds and connectors on these enclosures, I’m wondering if they have any utility at all. I was thinking of simply pulling the drives and destroying them or trying to connect them to my old iMac and erasing them. Otherwise I cannot see their utility at this point.
1 Like
I agree that USB2/FW enclosures are not useful unless you have some old (e.g., PowerPC-era) Macs. Remove the drives and e-waste recycle the enclosures. Then either wipe/recycle the drive or put it in a more modern enclosure.
USB3+/Thunderbolt3 enclosures are still quite useful. Keep using it if you have a use for it. If you need a larger drive, you can usually swap out the internal drive for a newer/larger/faster one.
Definitely wipe old drives before giving them away unless you’re absolutely certain there’s nothing that could cause you problems if someone else were to access it.
The easiest way to wipe a drive it to use the command-line diskutil to write zeros (or random bytes) to the entire drive. The steps are going to be:
-
Connect the drive. Use the enclosure you’ve got. If the enclosure is broken or too slow, a basic USB3-SATA adapter can be used. I have one of these for this purpose: FIDECO SATA/IDE to USB 3.0 Adapter.
-
Identify its device name.
-
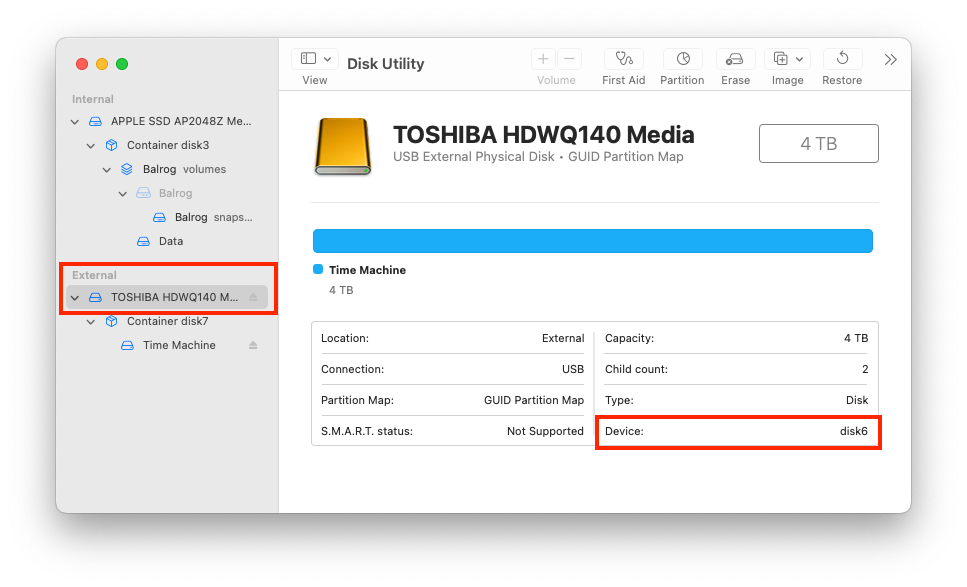
The easiest way is to use the graphical Disk Utility. Select the physical drive and look at the Device field:
-
Alternatively, type
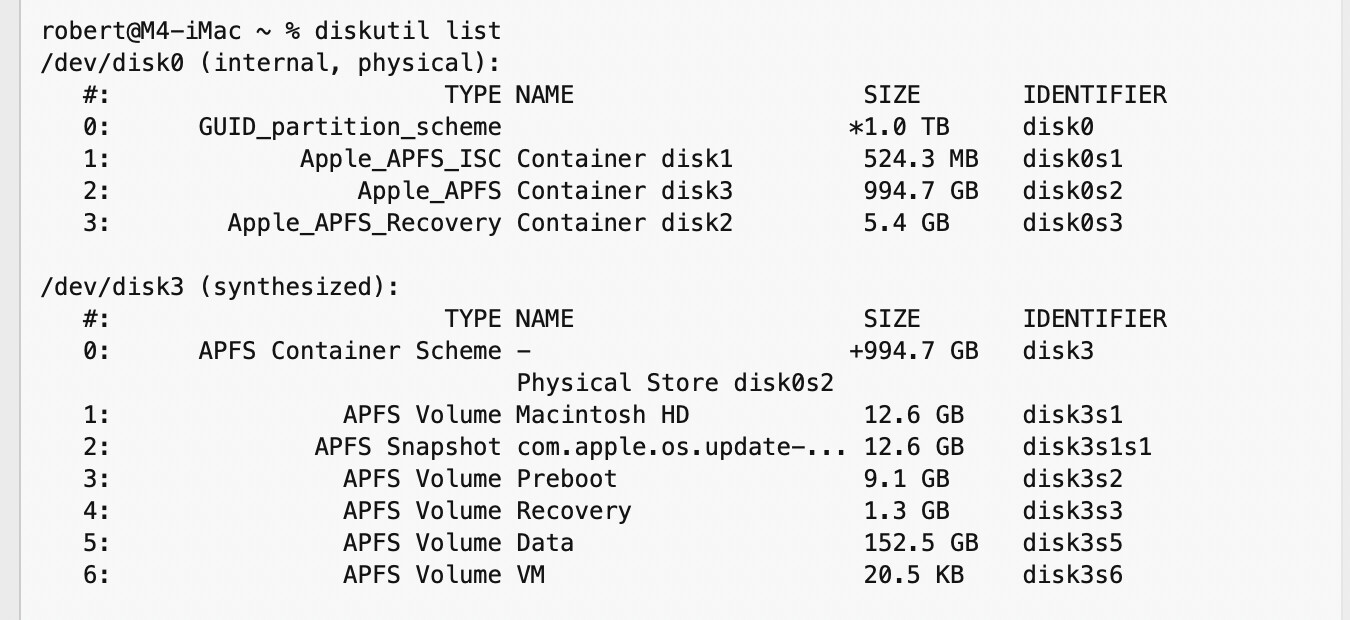
diskutil listinto a Terminal window and look for it. If it is formatted with HFS+ volumes, then you’ll see a physical device containing the volumes. If it’s formatted with APFS volumes, you’ll see a physical device with an APFS container and that container’s synthesized drive containing the volumes. For example, on my Mac:$ diskutil list ... /dev/disk6 (external, physical): #: TYPE NAME SIZE IDENTIFIER 0: GUID_partition_scheme *4.0 TB disk6 1: EFI EFI 209.7 MB disk6s1 2: Apple_APFS Container disk7 4.0 TB disk6s2 /dev/disk7 (synthesized): #: TYPE NAME SIZE IDENTIFIER 0: APFS Container Scheme - +4.0 TB disk7 Physical Store disk6s2 1: APFS Volume Time Machine 3.3 TB disk7s2In the above fragment of output, my Time Machine volume is on
disk7, and its container is backed bydisk6s2. You can also see thatdisk6has a container that synthesizes disk 7. So this physical drive isdisk6.
-
-
Eject/unmount all the volumes on the drive. The easiest way is to do this using the graphical Disk Utility. You can also use the
diskutil unmountDiskcommand. Provide the device’s name (e.g.,diskutil unmountDisk disk6) -
Use one of these commands to erase it:
diskutil zeroDisk- write zeros to the entire disk. (e.g.,diskutil zeroDisk disk6)diskutil randomDisk- write random data to the entire disk. (e.g.,diskutil randomDisk disk6). Although you can tell it to do this multiple times, once should be enough.disktuil secureErase. Use either level 0 (zero-fill) or level 1 (random data). There is really no good reason for multi-pass erasure. (e.g.,diskutil secureErase 0 disk6).
All of the above diskutil commands require your account to own the device. Which typically means that you must be logged in to an administrator account and use the sudo command to run it with root-level permissions.
e.g., instead of diskutil zeroDisk disk6, type sudo diskutil zeroDisk disk6, and type in your password when prompted.
Unfortunately, the graphical Disk Utility no longer has an option to zero-out or secure-erase a disk, so you need use use the command-line diskutil or a third-party tool.
7 Likes
People in the Vintage Mac Reddit group would probably be interested. I found a use for older enclosures when I revived my MDD G4 last summer.
2 Likes
Any tips on physically destroying old drives before discarding them? They seem to be built like a tank, and if there is a simple way to do this I’d prefer it over the hassle of trying to figure out how to hook up old tech for a wipe command. (And no, I don’t happen to have a strong electromagnet close at hand.)
If encrypted, how about submerging them in a bucket of water? If not encrypted, maybe drilling through the platters/chips.
2 Likes
I’ve tried taking old spinning-disk drives apart in the past (after copying their data elsewhere and using the very longest/most thorough erase option in Disk Utility). IIRC it wasn’t too difficult with basic tools, maybe some force was required here and there.
The magnets inside are very nice for the fridge or elsewhere, and the actual discs were so shiny I could use them as mirrors. The discs themselves take up a lot less space than the drive so I think I stored them somewhere. They can also be used as decoration, perhaps signal mirrors, etc.
I searched online for ‘hard disk shredder’ and there were a mix of results of software products and physical shredding machines. Maybe there is an affordable local service in your area if the machines are expensive.
Those with technical knowledge could say if there is anything else in a hard drive enclosure that could contain sensitive data that also needs to be destroyed, ie caches in a chip on a board or something of that nature…
2 Likes
This is very useful, thanks. I may be able to connect the drives to my old iMac, which has USB-A ports and Thunderbolt 2 (or 3) ports. I believe I have an adapter to link the Firewire connector on one of the externals to the Thunderbolt 2/3 port. Questions:
- what’s wrong with an Erase disk from the DIskUtil app? (Or simply taking the physical drive apart?)
- what is a “synthesized” disk? Don’t believe I’ve seen the term before. In the above image, you have one physical drive that is listed as two separate disks it seems. But they are both “disk6”?
THey’re not hard to disassemble with the right tools.
1 Like
If one (like the government for instance) is willing to spend a lot of bucks on it…nothing short of physical destruction is adequate. Beyond that, yeah, single random is probably enough. Me though…I just use a sledge hammer on the drive mechanism after pulling the circuit board off and if I’m motivated I pull the platters out and then bash them into lumps
1 Like
I too have a small collection of external drives, all FW I think. I also have a good Epson flatbed scanner, but it’s FW800. Read up on connecting it and it seems not a good way as it involves not one but at least 2 dongles. As for the drives, something I found may be of interest… it’s basically a USB doc that one can just drop an old SATA drive onto to access the contents (i.e. to wipe them). Last I looked it was under 20 bucks…
3 Likes
I vote for a docking station like the one posted above by paulc.
One dock can probably handle all the drives, so long as they’re SATA HDDs.
If they’re older, with the old-style 40-pin connectors, leave them in their current enclosures. Except for firewire, unless you have an older Mac around that can still accomodate FW400 or FW800. The Apple thunderbolt-to-firewire adapters are selling for ridiculously high prices on ebay these days.
I can’t understand the obsession with physically destroying old drives “to prevent others from getting at the data”. If you’re THAT paranoid, do it. But all you really need is software that will zero out the drive, OR, zero out the “free space” on a drive after erasing it with Disk Utility.
I don’t toss drives out until they’re physically broken and won’t work any more. I can just about always find something that can be stored on older, slower drives.
Side story involving older drive:
This past week as I was checking out older audio projects from some years ago, I found that somehow a particular project in my archives had been “saved wrong” – I had kept an earlier, “bad” version of the project and mistakenly erased the “good one”. All my current archives had the wrong files in that project folder!
So… I went up into the attic, and broke out my 2006 year 24" iMac Core2 Duo, which had been packed away up there a few years now. I set it up next to my m4 Mini, and it booted right up, with the almost-20-year-old hard drive inside. It had the correct project folder, and I was able to copy that to another drive and then re-populate my archives with it!
I have a few other HDDs around that are that old, perhaps OLDER.
Sometimes it pays to keep the old stuff around if you can…
5 Likes
I don’t think it’s so much of an “obsession” for some as an indicator of varying uses of computers. For hobbyists, retirees, and non-business users, yes, physical destruction is more of a fail-safe than a strict requirement. But I’d say anybody who stores client data, who works with confidential or sensitive information, or who uses their computer to run a business, is being careful and responsible by destroying old storage media.
4 Likes
AND sometimes I wonder why I have to get my panties in a bunch of “erase” drives that are more than 2 decades old.
I’m pretty sure one of the drives is a backup drive for a very old MacBook Air. That can be connected directly to the Air and erased from there. The Air still boots up and is functional enough to erase a drive. I am pretty sure the other two drives can be connected to an older (2014) iMac via a Firewire-to-Thunderbolt adapter (which I have). I should be able to erase them from there. I’m also quite sure I’ve pulled off anything of value from those drives. I’ll find out once I have time to dig them out, unwrap them, and reconnect them.
ID theft happens, and when a bad guy gets into an old drive that still contains data bad things can happen. I know someone who went through a lot of trouble after that happened. That was sometime around 2000 but I’m still very careful about erasing or disabling hard drives.
They’re usually held together with Torx screws. A good screwdriver set with Torx bits should be enough to remove the cover and start taking parts out. They’re on tight, so you may need to use some force, but they will come out. You’ll want to remove the head assembly, and then the screws at the spindle that holds down the platters and its spacers.
Industrial shredders can also destroy HDDs. You probably don’t have one, and they’re expensive, but professional data destruction/shredding services should have them.
Not likely. The caches on a HDD are normally RAM, and will get erased when power is removed.
Apple used to sell a TB-FW800 adapter. No longer made, but if you have one, it should work. But note:
- You’ll need additional adapters, since it is FW800 (your drive might be FW400, which uses a different connector), and modern Macs use TB3, which uses a different connector from TB1/2
- The adapter can’t pass power. You said your drives have their own power bricks, so you should be fine, but if you want to use this with a bus-powered drive, you’ll need a powered FW hub.
- The most recent macOS versions (26 and later) have no support for FireWire, with or without an adapter.
It doesn’t zero-out the entire drive. It only re-creates the file system structures. It would be pretty easy for disk-forensic software to recover your files afterward.
The zeroDisk, randomDisk and secureErase options (not available in the graphical app) actually overwrite everything, making recovery effectively impossible. (See my comments below regarding the possibility of recovering data afterward).
Sure. Remove the platter and either break it (if it’s a glass platter) or use sandpaper to abrade the surface. Nobody will be recovering data from that. But you also make it impossible for anybody else to use the drive. Zeroing out all the blocks leaves it usable.
APFS volumes are not directly stored on a device. Instead, a partition acting as an “AFPS container” is created. That container acts as a virtual storage device (which diskutil list calls “synthesized”), on which APFS volumes are created. The volumes are where you store data.
A physical device may have multiple containers, each with its own set of APFS volumes. Your internal SSD is formatted this way. Each container occupies a specific region of the device. All volumes that share the same container share that region and actually share the same pool of free space.
Not quite. If you look at the graphical Disk Utility screen shot, you’ll see that I selected the physical device (in the left-side column). It is “disk6”. But if you look immediately under that, you’ll see a device called “container disk 7”. This is the APFS container on the device, which is synthesizing a “disk7” device. And below that is “Time Machine”, which is a volume created in that container.
The command-line output fragment shows the same thing:
- Line 3 (
/dev/disk6 (external, physical):)
This is the start of information for the “disk6” device. And the parenthesized text indicates that this is external media and it is a physical (not virtual) device. - Line 7 (
2: Apple_APFS Container disk7 4.0 TB disk6s2).
This is partition 2 on disk6. Which is why its identifier is “disk6s2”. it’s type is an APFS partition, and its name indicates that it is a continer used to synthesize the virtual disk7 device. - Line 9 (
/dev/disk7 (synthesized):)
This is the start of information for the “disk7” device. The parenthesized text says it is “synthesized”, which basically means that it is not a physical storage device, but is created out of the content from another storage device. In this case, the “disk6s2” APFS container partition. - Lines 11-12 (
0: APFS Container Scheme - +4.0 TB disk7 ... Physical Store disk6s2)
This is indicating that the “disk7” device is an APFS container, and that its physical storage is “disk6s2”. - Line 13 (
1: APFS Volume Time Machine 3.3 TB disk7s2)
This is partition 2 on disk7, named “disk7s2”. I’m not sure why there is no “disk7s1”. I assume it’s an empty slot of the GPT partition table. (The “1:” at the start of the line is just for human readability and doesn’t mean anything).
This is the Time Machine APFS volume stored in the device’s APFS container.
Government standards require physical destruction. Personally, I think this is completely unnecessary, although I understand the paranoia associated with some very sensitive data. I assume the regulations go back to how to destroy paper documents, where they must be burned under supervision, and the ashes need to be stirred to make sure nothing remaining is legible.
I’ve read articles about how a magnetic force microscope can show after-images of data that has been erased. But have yet to read a single article anywhere, not even anecdotal, showing how any actual file data has been recovered from an erased drive using such a technique. So it’s something that doesn’t concern me.
Docking stations like that are nice if you need to do this a lot, or if your backup strategy involves using bare drives.
The USB3 adapter I cited includes the PATA connectors used by 3.5" and 2.5" drives, so it can access anything other than a SCSI drive.
I would “shuck” the drive out of any FW or USB2 enclosure, simply because those interfaces with throttle performance, making the erasure take much longer than necessary. If the FW enclosures are still functional, consider donating them to some users group, since they’re faster than USB2 and may be of value to people with old computers.
In which case, you do want to physically destroy them. I’ve seen plenty of repair videos where a dead HDD was resurrected by swapping its circuit board with one from an identical-model drive. Or where the platters were transplanted into a known-good drive, or where the head assembly was replaced.
In other words, someone who wants to recover data from a dead drive, may well be able to do so. If you can’t erase it, then you should destroy it.
7 Likes
I hadn’t been able to boot my MDD for years, due to a failed power supply. I got one from a reliable seller on eBay (he refurbishes them himself and will take your dead power supply and refund part of your purchase price).
It was like traveling back in time. There was quite a bit of stuff from my old job, as well as older software which included a utility that Adobe provided, back when they still engaged in helpful behavior. It converted PageMaker 3 files and earlier to PageMaker 4, which could then be opened by InDesign. The oldest documents I converted were from 1988–89. A bit pointless, but it seemed really awesome in a nerdy sort of way. I took a couple of them all the way from ancient PageMaker to Affinity Publisher. I like having some Wayback Machines around.
1 Like
I have an older iMac that I have used previously to connect to the drives. So, no reason why it shouldn’t work now.
Correct. Any Mac old enough to have a native FW port or a TB1/2 port will not be able to run macOS 26 anyway.
With respect to performance, I used FW on my 2002 PowerMac, whose native USB ports were only version 1.1. After I installed a USB 2 card, I found that the performance of FW400 was comparable to USB2 (actually, slightly faster). FW800 will definitely outperform USB2.
But if your Mac has USB3 ports (introduced to the iMac in the late-2012 model), then that will outperform either FW spec, which might justify replacing the enclosure.
1 Like