Hi all,
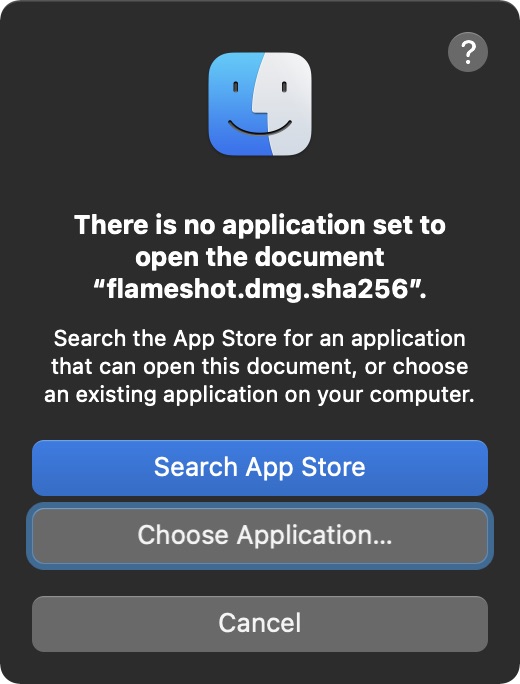
I recently downloaded a DMG with it’s belonging .dmg.sha256 checksum text file. When trying to validate the download by opening the checksum file, I was astonished that MacOS 12.1 doesn’t recognise the checksum file. I know that the terminal command ‘shasum -a 256 filename’ can generate a checksum. But copying the result and comparing visually a long line of characters - that’s not user friendly. Somebody knows a neat tool or easier way to verify checksums? Thanks
Nope. The visual method against a Terminal derived checksum is the way I’ve always accomplished that.
Thanks for your answer, Al. I used Total Commander on Windows since 1995 who let’s you simply double-click the file containing the checksum (e. g. filename.dmg.sha256). Since the filename is identical with the downloaded DMG, it will compare the two checksums and show a validation or error message. There must be a similar solution for MacOS…
I don’t know what format this “sha256” file is, but the standard format used by the shasum tool (and other related tools like md5sum) is a text file containing hashes for one or more files. Each line of the file consists of the hash text, a character representing the file type (* for binary, a space for text, etc.), followed by the filename. This is also the format of the output generated when you use shasum to generate hashes.
Assuming your checksum is in this standard format, you can run shasum with the -c option to verify all the files it references. For example, using a file “Notes.txt” I have on my computer:
$ shasum -a 256 Notes.txt
ee6c0165947edecc798cbc408202866e21954384ac7b0fba6d45a11deca65daa  Notes.txt

$ shasum -a 256 Notes.txt > Notes.sha256

$ shasum -c Notes.sha256
Notes.txt: OK
And if I edit Notes.txt, so the hash no longer matches:
$ shasum -c Notes.sha256
Notes.txt: FAILED
shasum: WARNING: 1 computed checksum did NOT match
So, assuming your flameshot.dmg.sha256 file is in the standard format and it is in the same folder as the corresponding flameshot.dmg file, you should be able to just type shasum -c flameshot.dmg.sha256 to verify the checksum.
See also shasum man page or type man shasum to see the documentation for the version installed on your computer.
6 Likes
Thanks a lot, David, for your complete description on how to use the command line tool. It got me a big step further to a solution.
The original SHA file (from a GitHub Download) lacked indeed the name of the file to verify. Although the procedure you described works perfectly fine on a text file, I get a Can’t read file message from the DMG. Security control seems to be bothered with the executable from an external source!
Anyway, thanks to your help, I did a new search on shell scripts and found a Finder workflow that seems to do the job. I will report how it works when I’ll be back on my Mac.
The checksum.workflow doesn’t work on Monterey : 10.8 required ![]() The project seems abandoned since 2017…
The project seems abandoned since 2017…
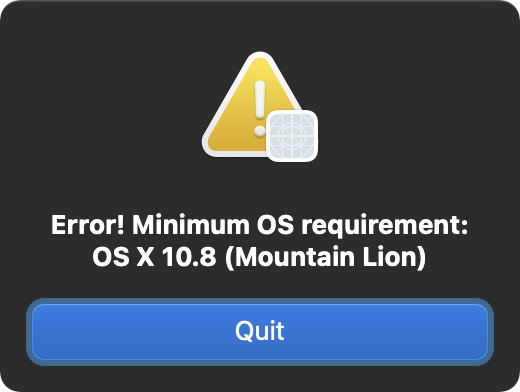
It looks like the macOS version check assumes the version has 3 components (e.g. 10.14.6 on Mojave). Monterey only has 2 (12.1). The script is just checking the 2nd component for at least 8, so it thinks Monterey is too old. A quick fix to workaround that problem would be to change the 7 on line 100 of checksum.sh to a 0. That may just expose other problems though.
2 Likes
The command-line shell requires permission to access files, just like any other application.
If you’re using Terminal for your session, it must have permission to access the location of the DMG you’re trying to process. You should use the Security & Privacy preference panel to do this.
You can either grant it access to specific locations that is has tried to access (e.g. Documents or Desktop):
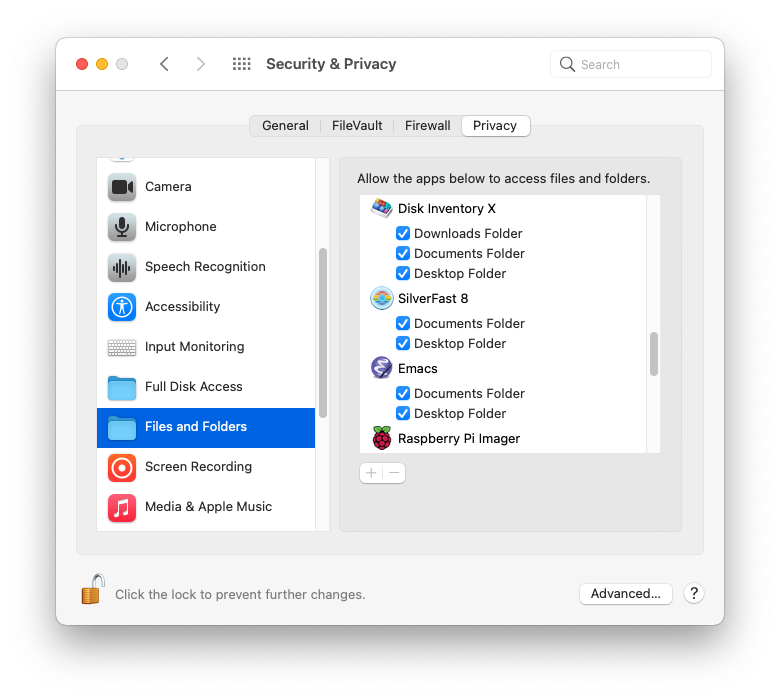
or you can grant it full disk access (so it can access everything):
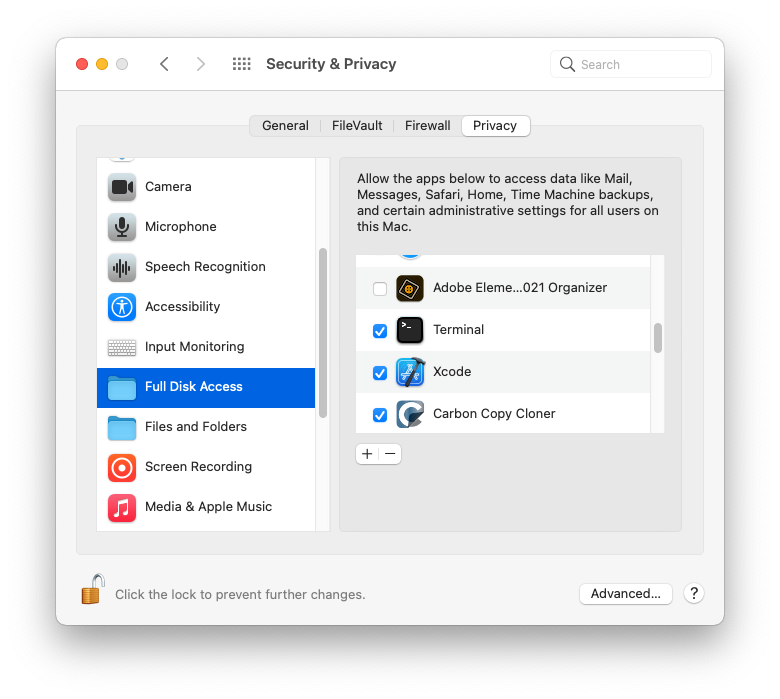
I give Terminal and other Terminal-like applications (e.g. XQuartz, which runs xterm terminal sessions) full-disk access, so can access whatever I require from those sessions.
4 Likes
Thank you, @blm that worked perfectly fine ![]() I left an issue report on the Checksums.workflow Github site.
I left an issue report on the Checksums.workflow Github site.
Here’s how it looks like:

@Shamino, many thanks for your instructions to give disk access to the Terminal app. In my case, I’ve already had granted full access. My error was that I was running the command from the root instead of the actual folder ![]() . Switching to Downloads Folder got me the correct
. Switching to Downloads Folder got me the correct OK prompt for shasum -c.
![]()
1 Like
Not exactly what you requested, however the OnyX tool ( which Joël Barrière has maintained for many years ) includes a checksum tool ( see “Files” section and its sub-tab “Checksum” ). OnyX offers other standard Mac maintenance that you might find helpful. Also, it’s donation-ware and you can try it at no cost. Safest place to download it is the Titanium Software website;
I see I’m late to the party, as there has been a range of discussion related to checksums.
But I’ll go ahead and add that the quickest way to get a checksum is to use the WhatsYourSign tool from Objective-See, which is a good idea to have on your computer anyway. I heartily recommend all his tools. With WhatsYourSign, you just right-click on a file, and then click “View Hashes,” and it gives you MD5, SHA1, SHA256, and SHA512. This doesn’t validate a checksum, it just gives it to you, but for a quick checksum, this is the easiest way.
I use checksums in my day job, and for them I use a program called Checkpoint, which creates an MHL file (media hash list). Double-clicking the MHL with Checkpoint installed verifies the hash of each file in a folder, as well as verifying that all files are present from when the MHL was created for that folder.
So there you have the simplest solution (with no verification) to the most complex (with verification of all files in a folder). Perhaps this will help someone!
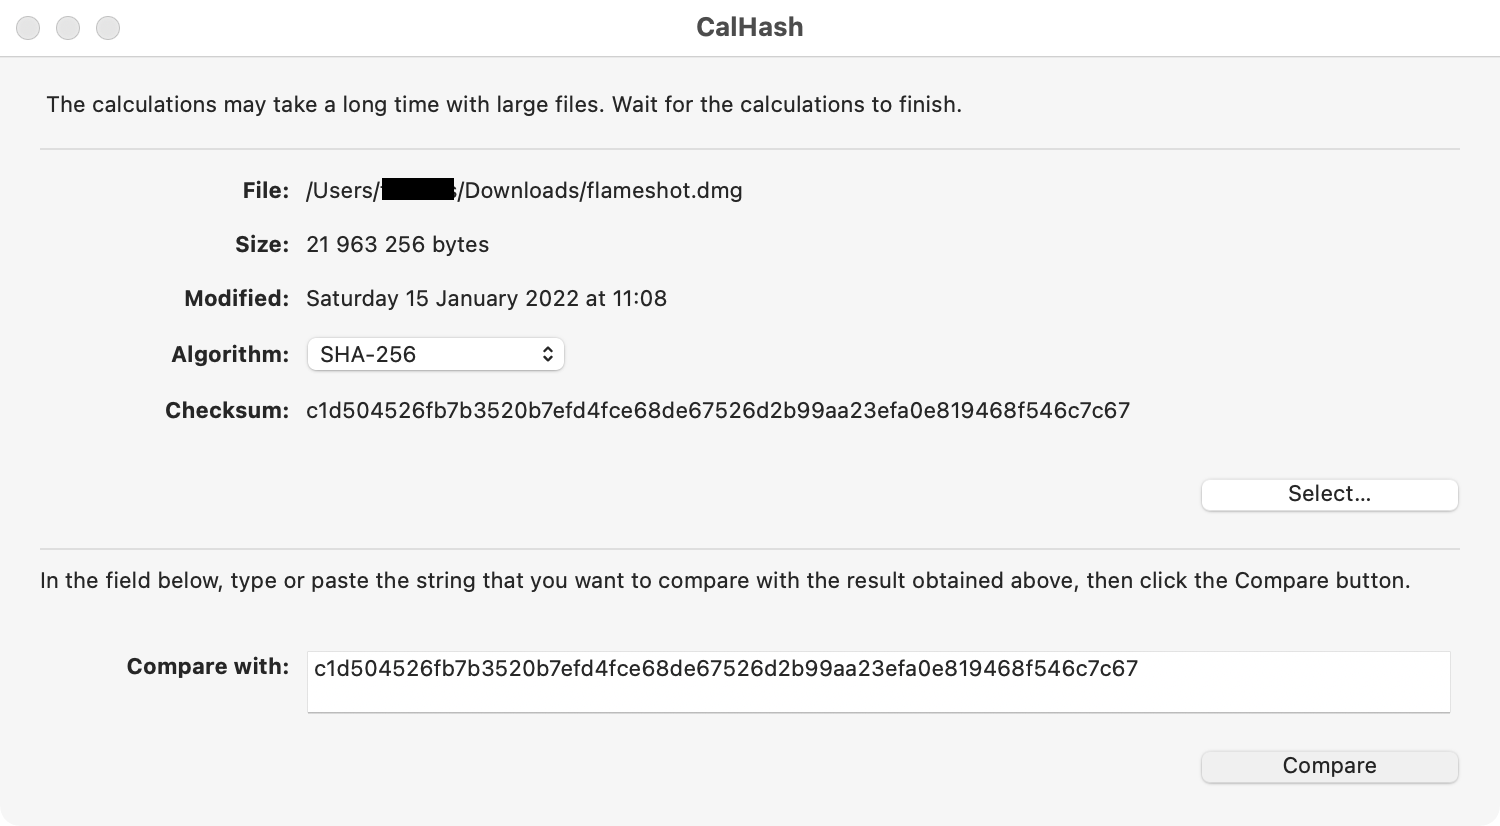
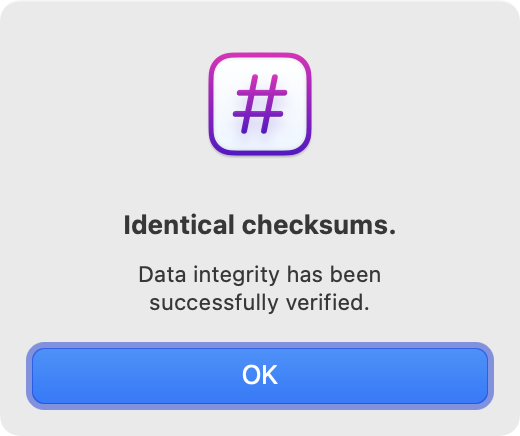
Thanks, @BrianS, for your attention to my original request (“without Terminal”). Titanium Software does indeed offer a specific app to “to calculate and compare the checksum (also known as a message-digest-fingerprint) for a file.” It’s called CalHash and there are current versions for Monterey and BigSur.
This get’s me for now really close to a hassle-free 2-step-solution :
- Open the original file into the ChalHash app
- Copy and compare with the provided checksum
Great!
I like the easy to recall right-click “Signing Info” provided in Finder from WhatsYourSign. And as you stated Chris, it’s a very useful security tool for any executable file on MacOS. Thanks for your help @tidbits43.
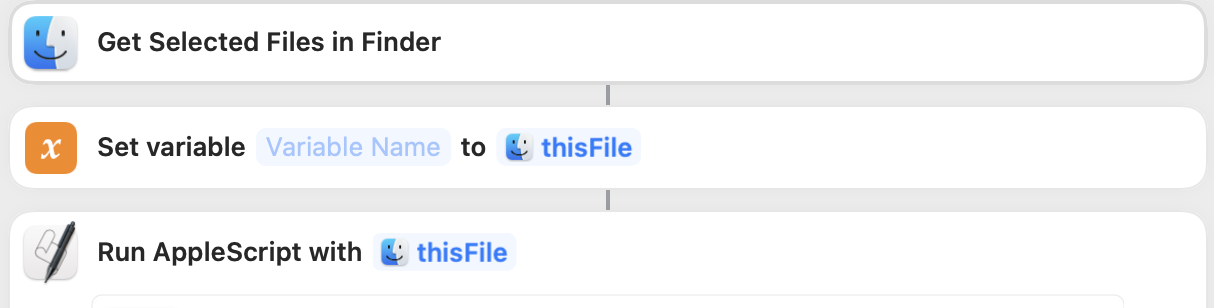
Path Finder, a replacement for the Finder, has a nice tool for comparing checksums. When I stopped using Path Finder a while back, I wrote an Automator workflow to do the same job. I copy the correct checksum to the clipboard, then right-click on the file in question to run the Automator service. This opens a dialog box with a field into which I paste the required checksum, and the workflow responds with a simple “pass” or “fail”. Not being very good at comparing long strings, I’ve found this quite handy.
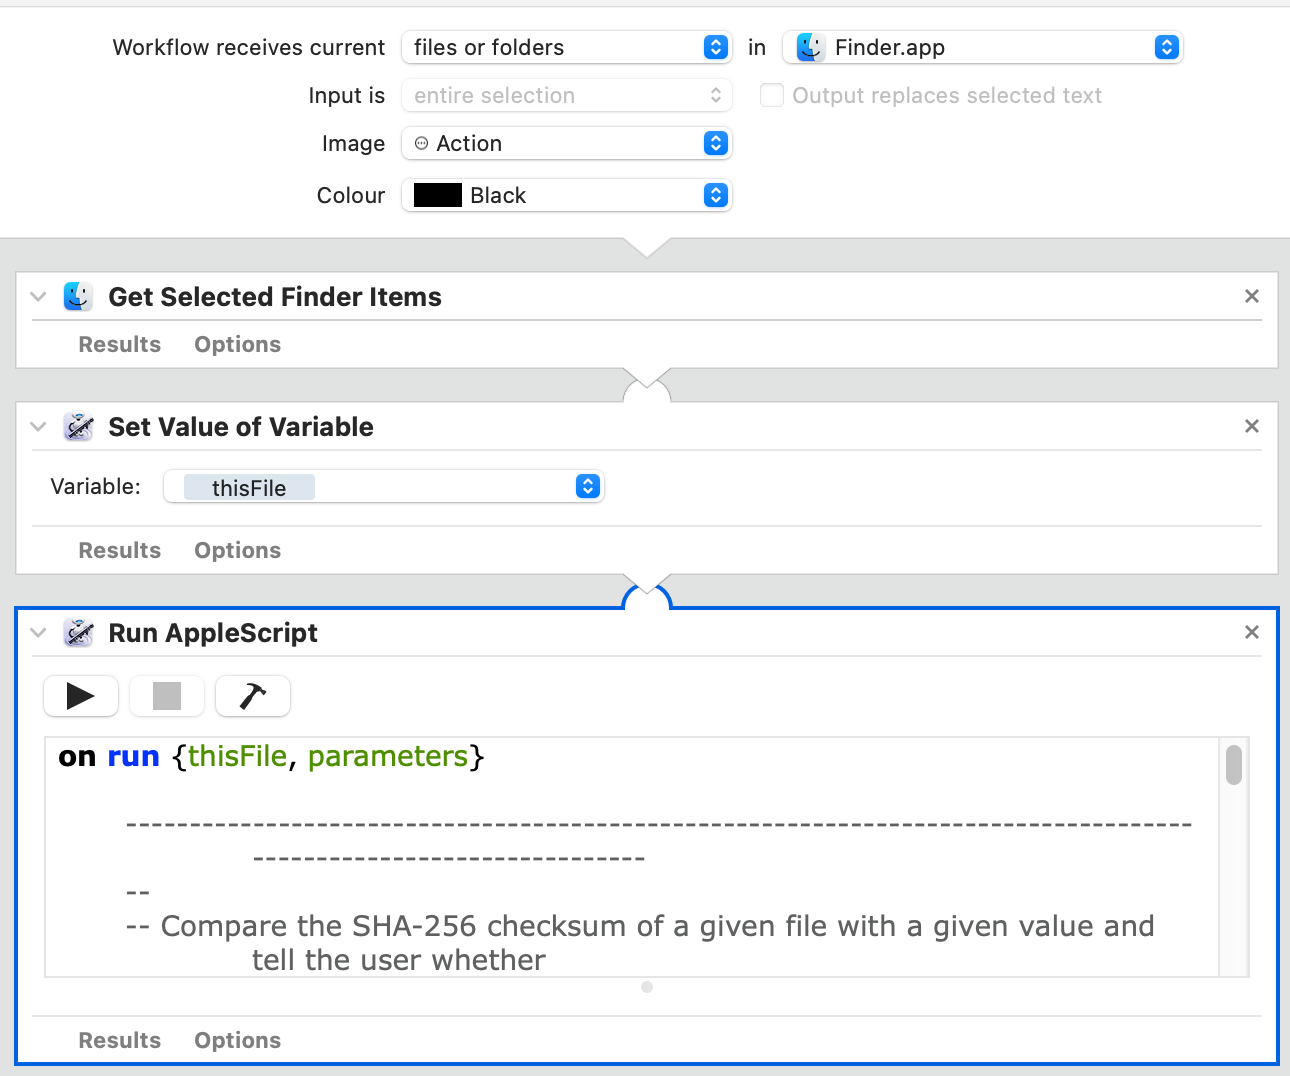
The workflow itself has just three steps, starting from: “Receives current files or folders”: “Get Selected Finder Items”, “Set Value of Variable” to “thisFile”, and “Run AppleScript”. For SHA-256 the AppleScript is below. I have a similar workflow for SHA-1, with the script modified accordingly.
on run {thisFile, parameters}
-------------------------------------------------------------------------------------------------------------------
--
-- Compare the SHA-256 checksum of a given file with a given value and tell the user whether
-- they are the same or different.
--
-------------------------------------------------------------------------------------------------------------------
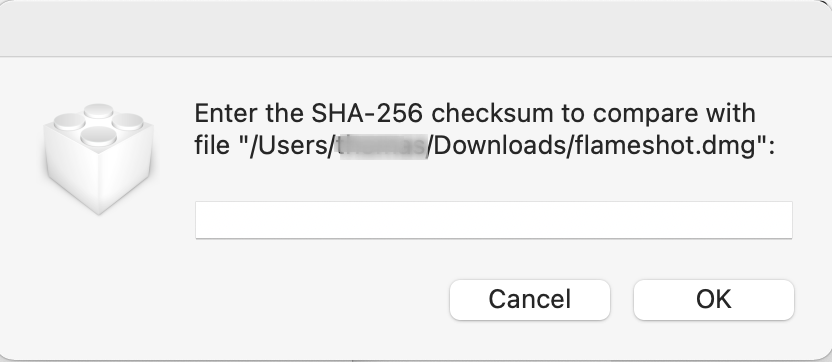
set thisFile to POSIX path of thisFile
set checkSHA256 to text returned of (display dialog "Enter the SHA-256 checksum to compare with file \"" & thisFile & "\":" buttons {"Cancel", "OK"} default button 2 default answer "" with icon 1)
set myShellString to "'" & checkSHA256 & " *" & thisFile & "'"
try
set myCheck to do shell script "shasum -a 256 -c <<< " & myShellString
do shell script "afplay System/Library/Sounds/Glass.aiff"
display dialog "The SHA-256 checksum for \"" & thisFile & "\" matches the value you entered." with icon file "Users:charles:Documents:design and layout:icons:success.icns" buttons {"OK"} default button 1 giving up after 5
on error
do shell script "afplay System/Library/Sounds/Ping.aiff"
display dialog "The SHA-256 checksum for \"" & thisFile & "\" does not match the value you entered.
Alternatively, there might have been an error in this Automator workflow." with icon stop buttons {"Too bad!"} default button 1
end try
return thisFile
end run
2 Likes
Sorry for reaching back to you lately @charles1. I implemented your workflow under Shortcuts on MacOS 12.1. It works as you mentioned up to point where I should paste the provided checksum. In my case, the entry field doesn’t accept clipboard data but only keyboard entries.
I documented how the Shortcuts actions look on Monterey (names differ slightly from your description)
and here the dialog window where I’m not able to paste anything into.
Hi @tomM, I’m not sure what is going wrong in Shortcuts because I have little experience of that app. All I can say is that if it’s easier than Automator then that will be a step forward! I’m accustomed to the eccentricities of AppleScript but find it hard to get my head around handling inputs in Automator.
In the meantime, try the steps below in Automator – this works for me in macOS 12.1. Apologies for not including that part before, but I wasn’t sure anyone would be interested.
Thanks @charles1 the workflow does accept clipboard paste. I’m still trying to research why the Shortcuts action doesn’t do the same job…
Anyone remember Cyberduck? Didn’t that have a checksum feature?
Moi! I just checked, and it’s still available: