Originally published at: Follow These Steps to Clear Space on Your Mac - TidBITS
Apple no longer makes it easy to tell precisely how much free space is available on your Mac, but you know when you don’t have enough. Adam Engst offers (and explains) 21 simple steps to clear space quickly.
4 Likes
I had a game-related storage crisis on an iMac recently, and I was getting nowhere until I started up in recovery mode, then saw in disk utility that there were snapshots taking up a lot of space (maybe just one snapshot, I can’t remember). I deleted it/them, and this dealt with the problem.
I wonder if there is something that can go wrong with snapshots when there is limited space left, and a game is downloading a large update?
This option is worth everything to me - I don’t have to think about emptying trash. I just trash items, and they’ll get purged in 30 days, which is usually more than enough time for me to figure out if it needs to restored - and if not, I’ve got Time Machine and other backups.
But it’s not the ideal solution. Windows solves this problem in a different (also useful but also incomplete) way. It lets you configure a maximum size for the contents of the Recycle Bin (their name for the Trash). So you can trash as much as you want and the files will linger forever, until the content of the Recycle Bin exceeds the threshold. Then it will start permanently deleting files, starting with the ones least-recently moved to the Recycle Bin.
A friend of mine had released what I consider to be the best trash manager - a utility called Compost. But it never got migrated to 64-bit for a variety of reasons, so it is no longer compatible with macOS. But it let you configure automatic Trash emptying with parameters including:
- Auto-delete items after a configured number of minutes, hours or days
- Limit the trash to a particular size - auto-deleting the least-recently-trashed items when it grows over the configured threshold
- Ensure that the Trash folder’s volume always has a minimum amount of free space. If the amount drops below the threshold, auto-delete the lest-recently-trashed files until the required space becomes available again.
And these can be configured system-wide or on a per-volume basis (each volume mounted by macOS has its own separate Trash folder holding trashed items stored on that volume).
It also had some really nifty utilities to show all the various Trash folders that your account may be using, the amount stored in each, and the ability to empty just one of them while leaving the others alone.
I’d really love for a new Sonoma-compatible version of this, but my friend doesn’t have the kind of free time needed to develop and support it, so that’s not likely to happen.
If you frequently find yourself looking at swap files that are large like this (more than the total RAM for an 8GB system and more than half of a 16GB system), then that is a strong hint that you need more RAM.
Unfortunately, RAM is no longer upgradable without replacing the whole computer, but this is critical information to keep in mind when shopping for your next computer.
Even though swapping to Apple’s flash storage is very fast, it is far from ideal and (depending on the specific nature of the swap activity) it may lead to premature wear on that SSD.
Thanks for this tip. I didn’t even know it was possible. I never use GarageBand, so freeing up its parts is very welcome.
1 Like
Snapshots will only be auto-deleted by the app that created them.
For Time Machine hourly snapshots, they are deleted after 24 hours. So you’ll never have more than 24 of them and deleted files will result in more free space 24 hours later.
Snapshots created by other software (like various backup utilities) will get deleted according to the schedule of the corresponding app. You should be able to identify the source of a snapshot from its name (visible in Disk Utility). Use the app’s configuration to control its snapshot management. If you’re no longer using the app, feel free to just blow away the snapshot (assuming, of course, that you know there’s nothing in there you want to preserve).
If you want to archive a snapshot, you can mount it and drag/drop files to an external storage medium. I don’t know if there’s an easy way to just archive a snapshot (e.g. make a disk image from it, which you can store externally), but that’s probably not generally a good idea, since it will containing everything on the volume from that point in time, which is probably more than you want to archive.
1 Like
My sister-in-law is dealing with an out-of-space problem right now…on her 1TB drive in an iMac. The biggest culprit by far (as reported by Storage in System Settings) is that System Data is taking up over 600GB! I called Apple Support. They couldn’t really say what might cause it to balloon like that. But they did say that the only solution now is to erase the drive and start over…which I guess is what we’ll do (unless anyone here has a better idea).
Adam, in Step 4 you write " Open System Settings > General > Storage > Applications , click the Kind column header, select all the apps marked Unsupported, and click Delete." I’m maxed out at High Sierra on my 2011 iMac so is there a similar Storage item in System Preferences? I know it isn’t in the General control panel.
Adam, you write " … if you have a massive Photos library you want to keep local, moving it to an external SSD can be a highly effective way of clearing space on your internal drive. "
Can you expand on that in a future article? I’m sure I’m not the only user to try this and fail (in my case the library is no longer updated when we back up our phones).
I’ve also moved my music library to the external SSD but my Sonos system cannot find it and the Sonos engineers cannot find how to make it work.
Thanks
Howard
Hi Ted, I’d zero in on suggestion #3 in the article. OmniDiskSweeper or a similar tool will give you insight into what that 600GB is.
3 Likes
Hi Dennis - I seem to recall that Apple changed the name of System Preferences to System Settings in macOS Ventura.
In High Sierra, you can view 32-bit Apps by clicking the Apple menu > About This Mac > System Report > Software > Applications.
Scroll to the right and look for the “64-Bit” column which will either say “No” or “Yes” depending on whether an application is 64-bit or not. You can sort the list by clicking on the column header.
Edited to add for clarity - macOS Mojave was the last version of macOS to run 32-bit apps. Since macOS Catalina, 32-bit apps are no longer compatible with macOS.
1 Like
The iMac was only using Time Machine. The disk had a ridiculously small amount of free space, like 200 or 20 MB or something and it was basically impossible to do anything with the computer at all, due to everything being painfully slow, so I was thinking that I was going to have to wipe it until I spotted the snapshot in recovery mode.
My impression was that it was triggered by a several GB download of game files, combined with something going wrong with a local snapshot - combined with a machine that doesn’t have a huge amount of free space on the internal drive by modern standards (20-50 GB normally). Note that this machine is permanently connected to the external disk drive that is used for Time Machine.
Did not see mentioned the step I often take first – check local backups of iOS units and delete them (sometimes not the latest one), but this might apply more to older systems as people less and less do local iOS backups.
You can also do via command line.
sudo du -sh /* | grep [0-9]G
which will show disk usage and filter results to not show anything under 1GB. You keep repeating the command with new path to drill down to the problematic folder.
For example if you see that /Users is overly large then
sudo du -sh /Users/* | grep [0-9]G
Will show you which user to drill into. Up arrow brings up the last version of the command and then left arrow to move cursor to where you need to type the folder and it supports tab to autocomplete.
It also requires full disk access enabled.
2 Likes
As @mikebrogan said, GrandPerspective or OmniDiskSweeper is your friend here. It should reveal what caches, logs, or support files have somehow gotten out of control.
Sure. Open the System Information app, choose Window > Storage Management, and click Applications.
You can also use St. Clair Software’s free Go64 app.
Hmm! I wonder what went wrong? Apple has a support page about the process, but there’s very little to it—you just move the library and then designate it the System Photo library.
That would be Step #6. ![]()
Your Photos library is just a single bundle-file (that is, a directory made to look like a single file).
You can move/copy this file anywhere you want. You can also create multiple photo libraries, if you have too many photos to comfortably keep them in one library.
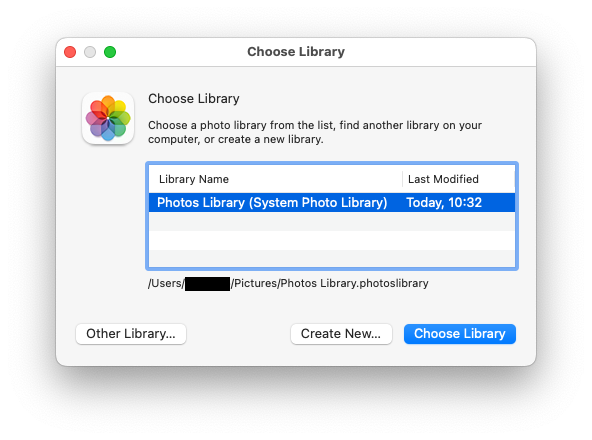
If you hold down Option while launching Photos, you will be presented with a dialog to let you create new libraries, choose the one you want to open, and add new libraries (e.g. ones copied from another computer):
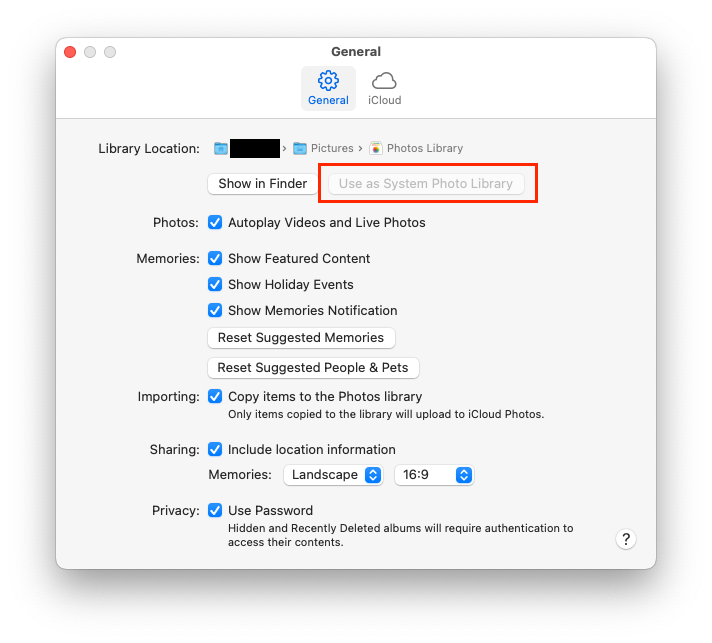
One library is designated as the “System Photo Library”. This is the one that will be used for iCloud Photos and Shared Albums. You can pick any library to be this one. Just open it in Photos, go to the Settings dialog, and tell it that you want that library to be the System library:
So, using these features, my suggestion would be:
- Create a new library to be your archive. Create it on external storage, to avoid consuming space on your internal SSD. Open that library.
- Import pictures from your main library to the new one. See:
Import photos from another library in Photos on Mac - Apple Support - Once you’re happy that everything is imported properly, you can delete the pictures from the main library.
In the future, hold down option when launching Photos in order to select the library you want to open. If you launch it normally (without holding any keys) it will open whatever library you had open the last time you were using the app.
Yeah, that sounds about right. You download a lot of game files, filling your drive. But during that time, a local snapshot gets created. So when you delete those files, the free space doesn’t come back until you delete the snapshot(s) holding those files.
Since these are TM snapshots, they should auto-delete after 24 hours, but there’s no need to wait that long, especially if the lack of free space is creating critical problems. And if you have an external TM disk, then the contents of those snapshots should be backed up there anyway.
2 Likes
macOS should only retain one (the most recent) backup of each iOS device. If you want a backup to persist longer (e.g. for archival purposes), then you must explicitly archive it - which will cause your next backup to create a new file instead of replacing the existing one.
With your iOS device attached, select it in the Finder. On the “General” tab, click “Manage backups…”. Select the backup you want to archive, right-click it and select “Archive” from the menu. You will see that backup rename itself from the name of your device to the name of the device followed by a timestamp - that backup will persist until you delete it and a new backup file will be created the next time you make a backup.
In general, if you don’t make archives, you should only have one iOS backup per device. While you should probably delete backups corresponding to devices you no longer own, you shouldn’t delete backups for your active devices, since you may need them to recover from a critical problem.
1 Like
Right – should read better before commenting! Sorry.
1 Like
Actually it is quite common users have several backups of the same device without having chosen to save multiple copies and I think that was standard in earlier days at least (talking about iTunes here). Nowadays people seldom connect their iPhones to their computers and pay Apple to handle transfer of photos and other things (like backups, not transferred).
1 Like
Thanks guys.
Howard
I think it may be simpler than that.
For my own system, I have very rarely archived backups. Usually as the last backup before wiping a phone (e.g. as a part of preparing it for a trade-in). I can tell those archived entries because they’re presented with a timestamp in the name.
But I’ve noticed this convention (timestamp with the name) for backups belonging to devices that definitely don’t fit this condition. I suspect Apple has forced existing backups into archive state as a part of some major upgrade (new macOS? new iOS?). But I’m not entirely sure about that.
Thanks for the suggestions everyone. Spurred on by your optimism, I did further searching of her drive…and eventually narrowed down the culprit. It was the Mail folder in the Containers folder of the Library folder in her Home Directory. It alone was over 600 GB!!
I’m not sure exactly what I want to do now. As she uses Gmail for her email, I’m thinking of just nuking everything and having Gmail download her mail to a clean Mail app. But that would lose all the folders she has set up within the Apple Mail app.
[BTW, the stuff inside the culprit folder is an odd structure. It shows her Home directory layout among other things. Not sure why that is relevant to Mail.]
1 Like