And it does not appear to apply any longer. There is no "Backups.backupdb folder” that one an see in the finder and if I try to use terminal to see what is on the volume, I get an operation non permitted.
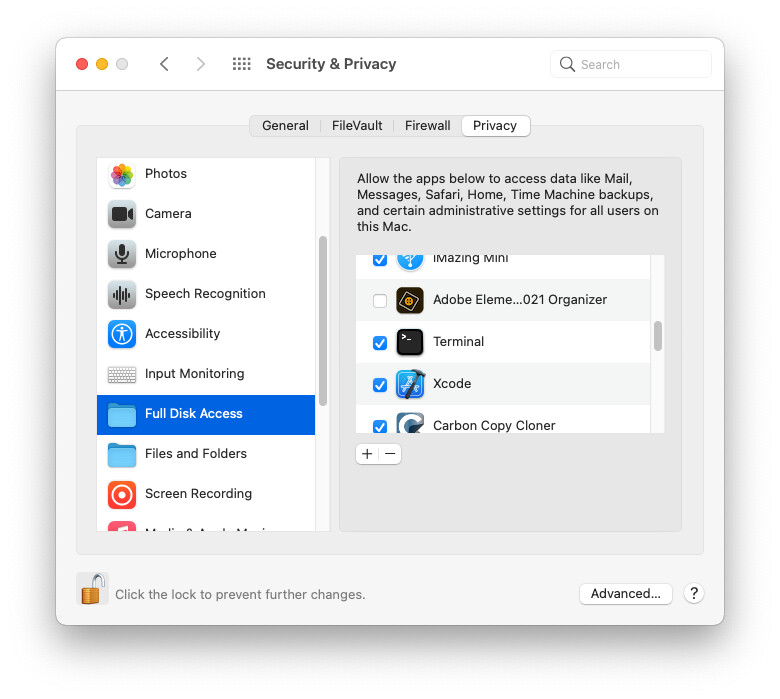
The “operation not permitted” error is because the app you’re using for the CLI (Terminal?) does not have Full Disk Access permissions, so it is limited in what parts of the file system it can access. If you grant it permission (System Settings → Security & Privacy → Privacy → Full Disk Access), you should be able to view what you need:
> ls -l /Volumes/Time\ Machine
total 224
drwxr-xr-x@ 6 root  wheel     204 Nov  2  2020 Backups.backupdb
-rwxr-xr-x@ 1 root  wheel  107524 Sep  1  2020 tmbootpicker.efi
I suspect your Time Machine volume is formatted APFS (mine is formatted HFS+). Time Machine on APFS (TMA) was introduced in Big Sur and is implemented differently from Time Machine on HFS+ (TMH).
If you create a new Time Machine volume using Big Sur, it is (I believe) created as TMA, and the system will convert the volume if it was previously HFS+. A TMH volume (created using an earlier version of macOS), will remain as TMH after upgrading the Mac to Big Sur.
TMH maintains multiple directory trees of files (one for each backup) that share storage through a complex set of hard-links in the file system. The directory structure looks like:
At the root level, there is a Backups.backupdb directory representing the entire backup database.
Within the backup database a directory for the computer that owns the backups. If your volume is only used with only one computer, then you will only see one such directory. If multiple computers back up to the volume (e.g. if its a Time Machine server for a network), then each computer will have a separate directory here.
Within a computer’s directory is a set of date-stamped directories, one for each backup. There is also a symbolic link named Latest that points to the most recent one
Within each backup, there is a directory for each backed-up volume. On my Big Sur system, I see three volumes - the system volume, its Data volume and the Recovery volume. It appears that the System and Recovery volumes are leftovers from Catalina - they have not updated since I upgraded macOS to Big Sur.
Within each volume’s directory are the actual backed-up files. Files and directories that have not changed since the previous backup are hard-links to the same files/directories, in order to avoid wasting space on the device.
TMA, on the other hand, is based on APFS’s snapshot mechanism. It uses a very different directory structure, that looks like:
At the root level, there is a set of virtual disk volumes, each one corresponding to a single APFS snapshot. These are presented in the Finder based on (presumably) the contents of a root-level hidden file, backup_manifest.plist that tracks everything, so the Finder doesn’t need to mount all of the snapshots in order to present them
You won’t see the snapshots from the command-line unless you explicitly mount them (e.g. using the diskutil command or a GUI tools that support snapshots, like CCC)
If you don’t mount any backup snapshots, it appears (again, from the article I’ve read) that command-line apps will only see the most recent snapshot at the root level of the volume. A folder with a name consisting of a timestamp and a .previous suffix. It will contain the contents of that specific snapshot (which I assume will be the most recent one).
Within each snapshot (as presented by the Finder) is a folder for each backed-up disk volume.
If you manually mount a snapshot, it will contain a single time-stamped directory (representing the backup). This will in-turn contain a folder for each backed-up volume.
Within each volume’s folder are the backed-up files. The snapshot mechanism is used to ensure that unchanged files share disk blocks across multiple backups.
You can’t erase individual files from TMA backups (so the old article @ace wrote is now only applicable to TMH backups), because snapshots are read-only, but the Finder interface will let you delete whole backups (including the associated snapshots).
It appears that TMA does not back up the System volume. So a system-restore from Time Machine will require first installing macOS (e.g. via Internet Recovery) and then restoring the Data volume from TM.
I was wrestling with this because I want to migrate the current TM data on a APFS formatted drive to a new larger drive. CCC does not support that. Is there another way for me to do that? I made big changes to my file structure on my computer and I fear I may have unintentionally deleted files (I have done this in the past) and only find out months later that the file is missing. I have discovered that my current volume only saves about 1 month’s worth. In order to save some space, I now no longer back up photos in TM since I use iCloud and save originals on another device that has a large TM drive.
I have seen suggestions to add the new drive and merely change TM so that it uses the new drive. If I choose that route, how does TM access these files if I need one from that drive? Copy using the Finder?
Not really. The problem is that the history is in the form of snapshots. No disk-clone utility that works on files (including CCC) can clone a snapshot history.
One possibility (don’t know if it will work) might be to use Disk Utility to “Restore” the old drive onto the new one. Select the new (empty) drive and click “Restore”. Select the original drive as the source. Once it has been copied, see if you can resize the APFS container to fill the new drive (if it didn’t happen automatically).
Let us know if it works.
My recommendation follows what others have said - start a new TM backup on the new drive. The TM GUI will not see any files from dates corresponding to the old drive, but you can manually access them.
Connect the old drive and mount the snapshot corresponding to the date you require (CCC can do this). From there, you can browse the snapshot and copy files/folders to your running system. When you’re done, unmount the snapshot and eject the drive.
Over there, I talk about the price for building external hard drives from 3.5" internal drives and USB enclosures. My backup drives were built this way.
Although an SSD is much much faster than a hard drive, depending on how much data you need to back up, an SSD of sufficient size may be too expensive for your budget.
For example, using the prices I cited, you can build an 8TB HDD for under $300, vs. a no-name 8TB SSD for $960 (Amazon price - the store I used for my HDD reference doesn’t sell SSDs larger than 2TB).
If you haven’t already bought your backup device, you should consider both HDDs and SSDs. Your budget, preferred capacity and preferred performance will determine which works best for your situation.
I have been using the 2TSSD when I traveled on the road for work. It was a TM backup for a 1T MacPro Laptop. Very easy to pack and provided security for lost data. I am retired and now have a 2T laptop therefore size is more important than portability.
I have used the 8TB Seagate Drives for my backup server on an old Mini to back up the machines on my home network with CCC. I am the guy that wears suspenders and a belt.
I will try your “restore” suggestion and report back.
The SanDisk drive looks like a good deal, if 2TB is an acceptable size.
As for the 8TB hard drives, the price is nice, but I always question consumer-oriented external drives like these. I don’t know what the internal mechanism is, so I don’t know anything about its performance or reliability.
But if you have experience with the one you’re using and you’re happy with it, I think that is more important than a spec sheet.
One possibility (don’t know if it will work) might be to use Disk Utility to “Restore” the old drive onto the new one. Select the new (empty) drive and click “Restore”. Select the original drive as the source…
Let us know if it works.
It does not. It won’t allow the restore to start. I am using your recommendation of saving the old TM backup and starting with a new drive.