Daytime photos are easier. Night-time photos of the moon usually require lots of manual adjustments to things like shutter speed and exposure. The black sky background convinces the automatic adjustments to try and expose for that, causing the moon to be completely blown-out, creating a bad picture.
I haven’t tried it on my phone, but with my Kodak point-and-shoot, I need to manually set a bunch of parameters and use a tripod to get a good picture.
Hasn’t the iOS Camera app since near forever supported a little tap gesture on the light object (in this case the moon) to adjust exposure for that rather than the black background?
Yes, but it only goes so far. When trying to photograph such an extreme contrast like the moon against a dark night sky, it isn’t enough. Even after repeatedly dragging the exposure slider down to the bottom, it is still too bright to resolve any details on the moon’s surface.
The only way I’ve managed to get a good moon at night is via a third-party app that lets you control the shutter speed. You want a fast shutter speed because a slow one brings in too much light and all you get is a white circle. Even then it’s tricky.
According to Apple, macro mode uses the ultra-wide lens. I assume macro mode adjusts the lens’s focus and activates a special set of image processing software for the image.
While searching for an answer, I ran across a company making add-on lenses and filters for iPhones (there are many others - this is just the first one I found when searching):
Their macro lens attaches in front of the telephoto lens, adding an additional 10x magnification. They present the following interesting comparison between it and Apple’s macro mode:
Depending on what you’re doing with the image, you may prefer one or the other approach.
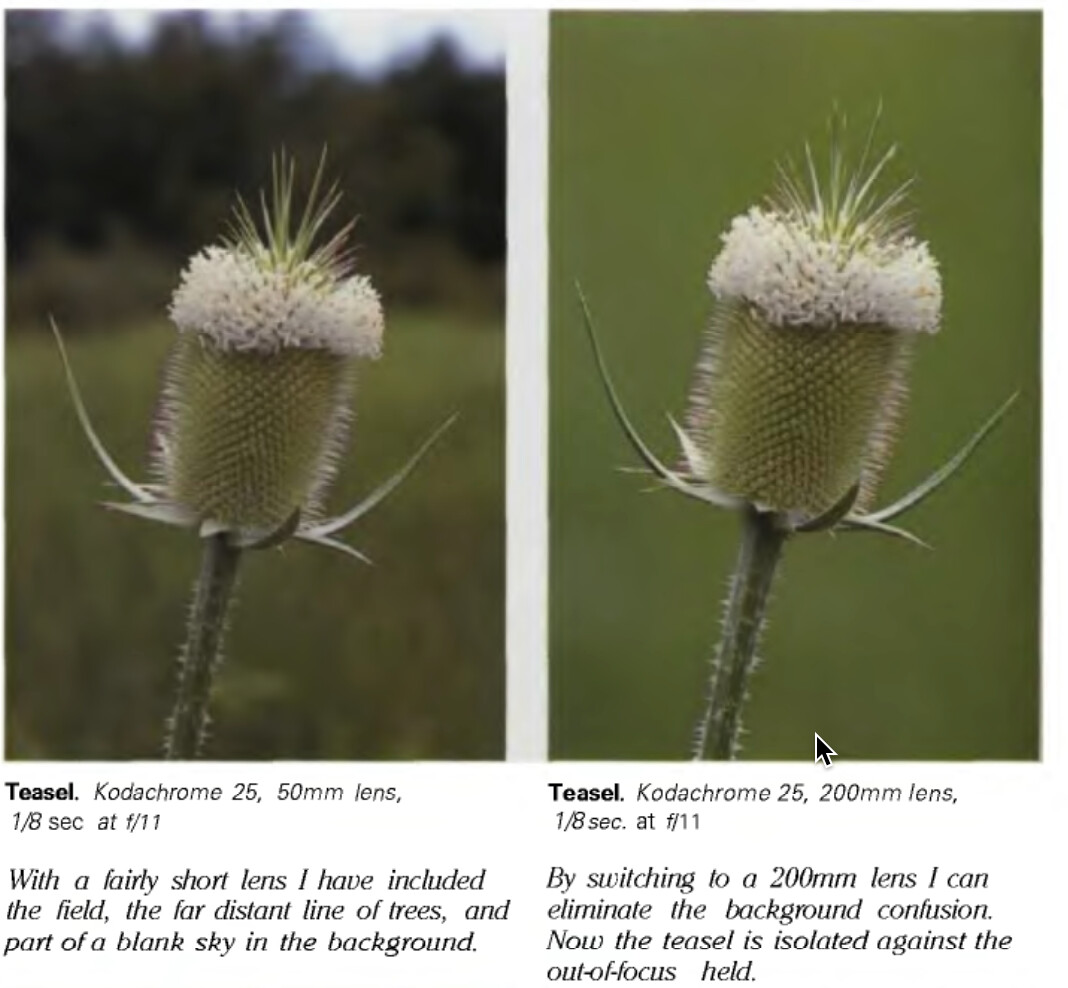
An important thing has been left out here–perspective. A given focal length, which is a physical property of a lens (not a camera system), gives a particular angle of view and perspective. This is independent of the sensor size. For a 35mm sensor, a 50mm lens provides a ‘normal’ perspective, i.e. one that matches pretty well what our eyes see. At different focal lengths, the relationships between objects changes. With telephoto, objects in the foreground and background seem to lose the distance between them. For a landscape without objects in the foreground, this can be subtle, but for closer subjects, it can be noticeable and either good of bad depending on one’s intent. With wide angle, closer objects become bigger than they ‘should’ be compared to background objects. Perspective is the primary reason why ~90mm focal length is used for portraits.
For a real zoom lens on a dslr, this shift can be easy to see as you zoom in and out. The focal lengths throughout the zoom range are still physical properties of the complex lens. But if you put the same lens on cameras with different sensor sizes, the so called ‘equivalent’ focal lengths no longer match the the perspectives you might expect.
As an example, I have a 150mm macro lens. On a 35mm sensor camera, it gives a 150mm perspective. I use it on a micro 4/3 camera, which makes it a 300mm ‘equivalent’ focal length. But its perspective is still 150mm–the camera just throws out all of the light that doesn’t hit the smaller sensor. The factor of two in telephoto reach the smaller sensor gives me is a before-the-shot analog crop factor, not a focal length multiplier. This is quite useful for macro, since I can shoot smaller things but still have the pretty good background-eliminating perspective of the 150mm lens at close distance. [1]
Apple is doing a lot of really complex stuff to knit images from two or three quite different perspectives together, and they do a pretty good job. But it makes my head hurt trying to think about it in any detail so I’ll just stick with real cameras…
[1] John Shaw’s “Closeups in Nature” is on archive.org, so I cribbed these screenshots from an expert (page 50):
Perspectives for two focal lengths. Neither is ‘best’. Sometimes you want to show more background to put something in context, sometimes you want to eliminate as many distractions as possible:
That’s tricky to share because it’s never the same. It depends on how dark it is, how bright the moon is, etc. I basically just do trial and error and experiment until I get a good photo. Sometimes that’s 2-3 pictures taken for one good one; other times I might take 20-30. Sometimes I give up as it just doesn’t seem to work no matter what I try.
Note that this isn’t only just for the moon. Trying to get a camera to expose and focus on anything when there’s extreme contrast (e.g. anything brightly lit against darkness) is really hard. For instance, this picture I took at DisneyWorld six years ago was a nightmare - I must’ve taken over 50 shots with various settings before I got something acceptable, and even here, it’s still not completely in focus:
Exposure for the moon is pretty close to what you’d use for an exposure on a bright sunny day, because the sun is illuminating the moon the same amount that it illuminates the earth around noon with no clouds. Compared to the distance to the sun, the distance from the earth to the moon is irrelevant.
In the film days, it was uncommon to have a light meter, let alone all this auto-stuff. Enter the Sunny 16 Rule. On a sunny day, you’d set the aperture to f-16, and set the shutter speed to the reciprocal of the ASA of the film (aka ISO of the sensor) or an equivalent exposure value. [1] If it wasn’t sunny, you’d increase the exposure a stop or three using other rules of thumb, or from experience. For the sensor era, I’ve seen the rule adjusted a bit and called the Moony 11 Rule. It’s a good exposure to start with, though you may need to adjust to taste.
Unfortunately, phone cameras have a fixed aperture which means less flexibility. You also (at least on my 13 mini and 16e) need to use a third party camera app such as Procam that lets you set ISO and shutter speed explicitly. But you can set them from a precalculation that should (in principle, if I haven’t made too many oopsies) work as a starting point:
The Mooney rule says that with f-11 I can have a shutter speed of 1/250 sec at an ISO of 250. My 16e camera has an f-1.6 aperture. That’s about 6 stops brighter than f-11 so we have to darken it again from the other two values. Taking 3 stops each from shutter speed and ISO gives you a shutter speed of 1/2000th second, and an exposure of ~ISO 30. Alas, the moon won’t be available here for a while so I can’t try it out.
That wide f-stop could be a disadvantage if you want close objects to be in focus as well. But it’s a very small camera, so you can’t have everything (e.g. an adjustable diaphragm in the lens).
[1] Divide any of the three values by two, then multiply one of the others by two, and you get the same exposure value. [2]
[2] As long as you’re in the ‘normal’ range of what the film/sensor can do. At the edges it gets more complex, especially for film (reciprocity failure).