Going bananas - Mac Studio M1 Max (Monterey) cannot erase external drives with Disk Utility

Hello,

I recently migrated from an intel 2018 Mini (Catalina) to a Studio M1 (Monterey).

Everything is running fine except for one irritating problem which I have been working on for days: with Disk Utility: I am unable to erase (APFS non encrypted) external SSDs which I use for backup and other file transfers.

What I tried-

  • many different SSDs (all high quality Samsung T7 used many times in the past and which always worked perfectly)
  • changing cables
  • tested all computer ports
  • obviously restart diskutil and rebooted the mac
  • indexing

I read many posts in the Internet describing the same problem, with no solution offered apart from “I go to my neighbour’s house to erase my external drives”

thank you very much for taking time to consider my problem.

Lucas: Agree that is weird. Consider using Disk Utility first to convert SSD to exFAT or FAT by way of ‘partition’ and do the whole drive or by ‘erase.’ See if that can be done. If so, then it might be easier to covert to APFS afterwards. I’ve had to do that on many SSD’s and can’t think specifically which ones. Best, Patrick

1 Like

thanks very much Patrick. I will test and give you a FU

Can you run Partition, and then Erase?

no, I tried. thanks for your interest

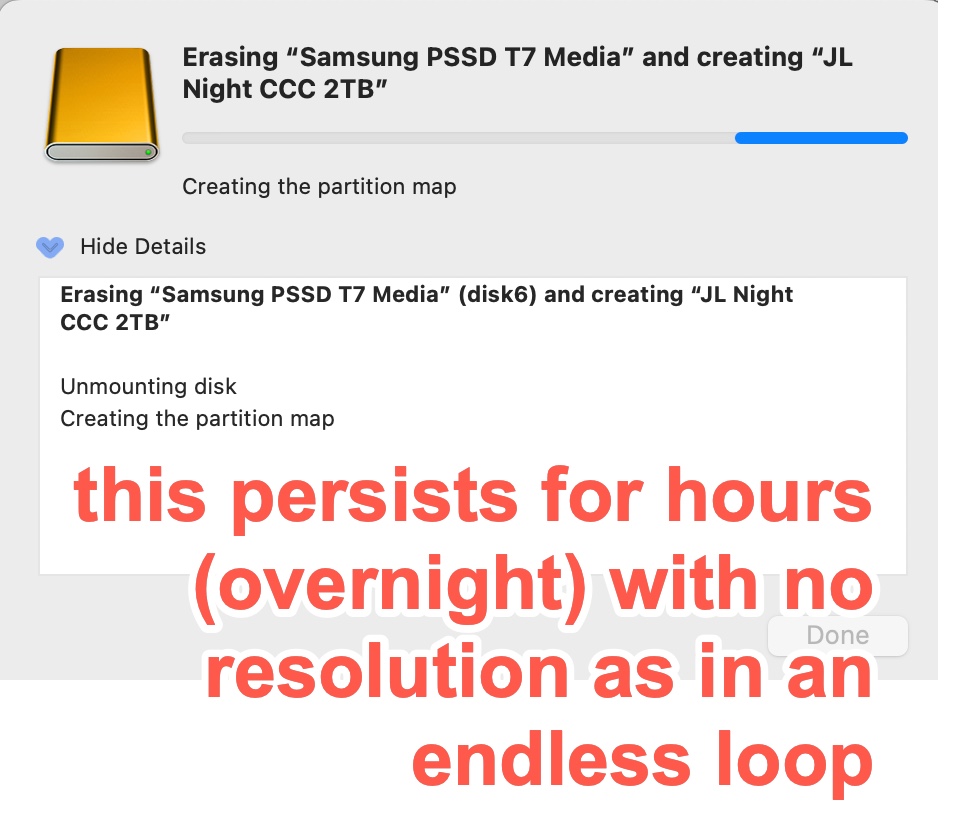
I wonder if a manual erase via the command-line might work.

First, type diskutil list to determine the device name for the SSD you want to erase:

$ diskutil list

/dev/disk0 (internal, physical):
...
/dev/disk1 (synthesized):
...
/dev/disk2 (external, physical):
   #:                       TYPE NAME                    SIZE       IDENTIFIER
   0:      GUID_partition_scheme                        *4.0 TB     disk2
   1:                        EFI EFI                     209.7 MB   disk2s1
   2:                 Apple_APFS Container disk3         4.0 TB     disk2s2

/dev/disk3 (synthesized):
   #:                       TYPE NAME                    SIZE       IDENTIFIER
   0:      APFS Container Scheme -                      +4.0 TB     disk3
                                 Physical Store disk2s2
   1:                APFS Volume Phredd                  1.4 TB     disk3s2

In the above example, the external drive is /dev/disk2. If you have multiple external drives, look more closely to determine which one is the drive you want to erase. For example, my /dev/disk2 has an APFS container that holds /dev/disk3, and that drive has a single APFS volume named “Phredd”.

With the device name, you should be able to use the diskuil eraseDisk command to wipe the disk, create a new partition table and create a new empty file system volume. If you type the command with no additional parameters, it will display help text explaining the parameters:

$ diskutil eraseDisk

Usage:  diskutil eraseDisk format name [APM[Format]|MBR[Format]|GPT[Format]]
        MountPoint|DiskIdentifier|DeviceNode
(Re)-partition a whole disk (create a new partition map). This completely
erases any existing data on the given whole disk; all volumes on this disk
will be destroyed. Format is the specific file system name you want to erase it
as (HFS+, etc.). Name is the (new) volume name (subject to file system naming
restrictions), or can be specified as %noformat% to skip initialization
(newfs). You cannot erase the boot disk.
Ownership of the affected disk is required.
Example: diskutil eraseDisk JHFS+ UntitledUFS disk3

You can type diskutil listfilesystems to list the available file systems:

$ diskutil listfilesystems

Formattable file systems

These file system personalities can be used for erasing and partitioning.
When specifying a personality as a parameter to a verb, case is not considered.
Certain common aliases (also case-insensitive) are listed below as well.

-------------------------------------------------------------------------------
PERSONALITY                     USER VISIBLE NAME                               
-------------------------------------------------------------------------------
Case-sensitive APFS             APFS (Case-sensitive)                           
  (or) APFSX
APFS                            APFS                                            
  (or) APFSI
ExFAT                           ExFAT                                           
Free Space                      Free Space                                      
  (or) FREE
MS-DOS                          MS-DOS (FAT)                                    
MS-DOS FAT12                    MS-DOS (FAT12)                                  
MS-DOS FAT16                    MS-DOS (FAT16)                                  
MS-DOS FAT32                    MS-DOS (FAT32)                                  
  (or) FAT32
HFS+                            Mac OS Extended                                 
Case-sensitive HFS+             Mac OS Extended (Case-sensitive)                
  (or) HFSX
Case-sensitive Journaled HFS+   Mac OS Extended (Case-sensitive, Journaled)     
  (or) JHFSX
Journaled HFS+                  Mac OS Extended (Journaled)                     
  (or) JHFS+

More information is available from the manual page. Either visit this link or type man disktuil in a terminal window.

So, if you want to erase /dev/disk2 and reformat it with a new APFS container/volume:

Unmount the disk

Either use the Disk Utility GUI tool to do this or use the “umount” command. Be sure to unmount every volume belonging to the physical disk. If there are mounted snapshots (e.g. those created by Time Machine), you will need to unmount them all. (And if it is a Time Machine volume, there may be a lot - to the point that some people recommend only trying to erase a TM volume from Recovery Mode, because there are far too many snapshots to unmount by hand).

The CLI method may look something like this:

$ sudo umount /Volumes/Phredd

When asked, type your password. If you still don’t have permission, then log in to an administrator account and try it from there.

Erase the disk

This should work. Note that I have not actually tried this (since I don’t want to erase any of my disks). Also, be careful with the commands, because you don’t want a typo to result in erasing the wrong device.

To erase /dev/disk2 and create a new GPT partition with an APFS volume named “BigRed”. you would type:

$ sudo diskutil eraseDisk APFS BigRed GPT disk2

Then re-mount the volume (if the Finder doesn’t do it automatically). The easiest way would be from the GUI Disk Utility or disconnect/reconnect the drive.

In theory, this shouldn’t do anything different from what the GUI disk utility does, but there have been times in the past where the CLI tool can do things that the GUI tool fails at.

5 Likes

If the above (command-line disktuil eraseDisk) fails, another thing to try is to manually wipe the start of the physical disk (maybe the first 100MB). Then remove and re-connect the device. macOS should see is it as unreadable and pop up a window asking you if you want to launch Disk Utility. From there, see if you can create a new partition table, partition, volume.

First, unmount the disk

Using the same example as before:

$ sudo umount /Volumes/Phredd

Erase the first 100MB of the physical volume

Use the dd command to copy 100MB from the /dev/zero device (a convenience device that returns an infinite stream of zeros when read) to the physical volume. Use a 1MB block size, to improve performance.

Be extra careful. A typo could result in clobbering the wrong device.

To erase the first 100MB of /dev/disk2, you would type:

$ sudo dd if=/dev/zero of=/dev/disk2 bs=1m count=100

At this point, the start of the physical drive is all zeros, and therefore is invalid. Unplug the device and re-connect it. Now see if Disk Utility can partition/format it.

4 Likes

Howard Oakley has written extensively on Disk Utility failing to work properly. Using command line usually solves the problem. See here for a list of Disk Utility posts on his site:

6 Likes

great reference ! thanks very much !!

thanks very much for your detailed message. I will give it a try. It will take me a bit of time to absorb all your info !

thank you very much @pcarrington @david_blanchard @Shamino @raykloss for giving my problem so much thought

As I prepared to embark on all the troubleshooting measures you suggested above, I decide to retry the disk utility erase procedure using every available port. Nothing worked except for the last port I tried, a UBC-C post located in the back of the screen. The complete erase procedure went smoothly and I was able to backup to the erased drive.

After that, incredibly, I could erase from any port - mac ports, hubs. My problem is solved. I am curious to ask if this rings a bell. Could the disk utility have in some way been reset after the first successful erase ?

thanks again

2 Likes

Hmmm. Weird. Maybe resetting NVRAM might help reactivate ALL your ports. Best, Patrick

I read that you can’t reset the NVRAM on M1 Macs ? thank you

Oh, I did not know that. Sorry. Best, Patrick

Found this link:

Recovery mode then open Terminal and type NVRAM -c
I do not have a silicon Mac so I don’t know for sure. Best, Patrick

2 Likes

thank you very much Patrick

All I can say is, occ. my external ports aren’t hot or triggering the attached drives, and, I must reset my NVRAM. This on 2013 MacPro I acquired via AppleCare replacement around 2016 I think, but got it new. It is Intel, of course. Best, Patrick

1 Like

I once had a serious problem with the Ethernet port on my mini. If ever I plugged an Ethernet cable into the port, the mac went into a kernel panic. I discussed it in this forum. The solution was simple: network settings → delete the Ethernet port → it re-created itself and all was fine.
Just to make sure I understand: resetting the NVRAM also “resets” all the ports on my mac ?
thanks very much for your post

Again, I don’t possess a Silicon Mac so not sure about that beast. But it DID reset all the ports on my intel macs including MacPro, MacbookPro. Best, Patrick

1 Like

OK thanks very much